Receipt Scanning for Loyalty

Friendbuy's Receipt Upload feature allows merchants to reward loyalty members for in-store purchases by submitting physical receipts. Merchants can configure multiple receipt scanning earning events, each with its own combination of matching rules based on store, member tier, and/or SKU so that members earn different point values depending on where they shop, what they buy, and their tier. This document outlines how to configure, manage, and automate this process in your Loyalty Program.
Adding the Receipt Upload Earning Event
Add this earning event tile to your Earning Event Widget so customers can see the option to upload a receipt in order to earn rewards.
Use Cases:
- Incentivize in-store purchases
- Run regional promotions for specific retail partners
- Reward for specific products/SKUs

To get started:
- Navigate to your Loyalty Program settings.
- Click “Add Earning Event.”
- Select “Receipt Upload” from the available event options.
Once selected, you’ll begin configuring the event logic in the “Event Rules” section.
Configuring Event Rules
Define when and how rewards are issued by setting conditional logic for the receipt:
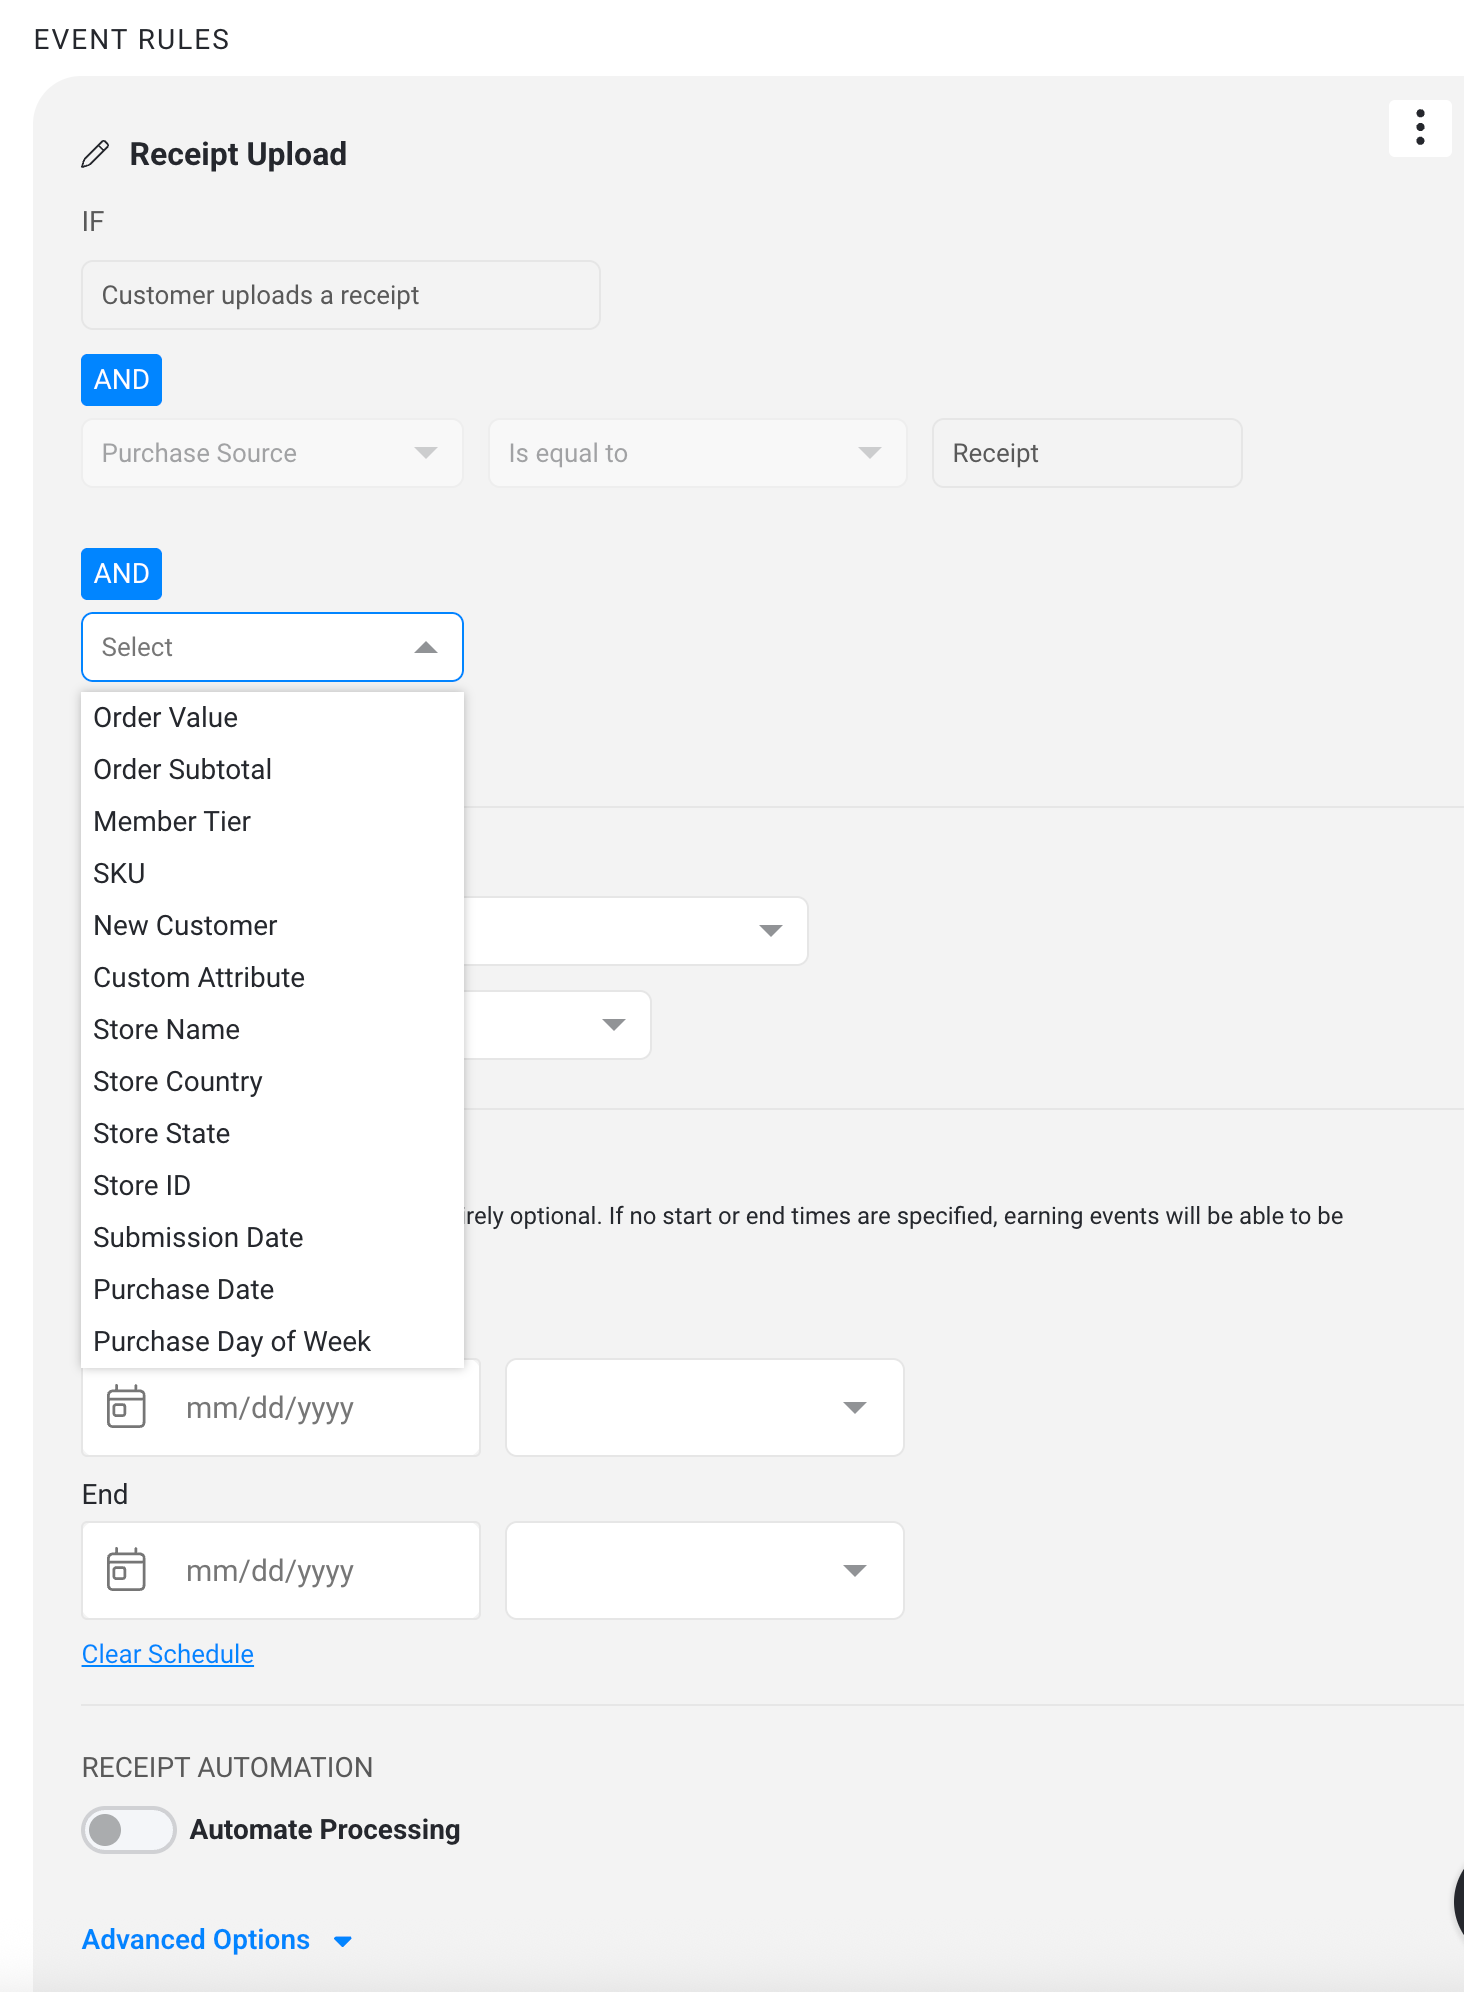
Required Rule
- IF: Customer uploads a receipt
Optional “AND” Conditions
You can refine the rule further using attributes such as:
- Purchase Source (e.g., must be from an in-store location)
- Order Value / Order Subtotal
- Member Tier
- SKU
- Custom Attribute
- New Customer
- Store details: Store Name, ID, Country, State
- Dates: Submission Date, Purchase Date, Purchase Day of Week
These options help restrict receipt rewards to specific campaigns, time periods, or customer types.
Configuring Multiple Earning Events
Friendbuy supports multiple, independently configured receipt scanning earning events per loyalty program.
Use Cases:
- Reward the highest tier members at a greater rate than lower member tiers for the same purchase
- Run a bonus-points promotion at one retail partner (e.g., Walmart) without affecting rates elsewhere
- Reward specific SKUs or product lines differently, regardless of store or tier
To create an additional event, repeat the steps above ("Add Earning Event" > "Receipt Upload"). Each new event includes all the same criteria, attributes, and reward configuration options as the original.
Notes:
- An event can't be deleted while it has pending or approved receipts associated with it.
How Friendbuy Matches a Receipt to an Event
When more than one receipt scanning earning event is active, Friendbuy automatically evaluates every submitted receipt against all active events' rules and applies the most specific match.
Example: A Gold-tier member submits a receipt from Walmart containing a qualifying SKU. If you have both a "Gold tier" event and a more specific "Gold + Walmart + SKU" event active, the receipt matches the more specific event.
Once a receipt is matched whether automatically or through manual review, later changes to a customer's tier or to an earning event's configuration do not retroactively change which event was applied to that receipt.
Event Scheduling
You can optionally schedule when the receipt event will be live: (e.g. if you want to schedule a weekend-only event where a customer can earn 5x points for purchasing in-store)
Use Cases
- Short-term pop-up campaigns
- Seasonal promotions
- Time-boxed retail partnerships

- Options:
• Start Date – The event begins earning points at this date.
• End Date – Points stop being earned after this date.
- Leave this blank for the event to stay continuously active.
Receipt Automation
Friendbuy’s Receipt Automation uses OCR (Optical Character Recognition) to automatically review and validate receipts submitted by loyalty program members. When enabled, this system can significantly reduce the manual effort required for reward approval — while still allowing flexibility via timing, validation logic, and control parameters.

Automate Processing toggle:
When ON: Friendbuy automatically processes incoming receipts using OCR.
Choose your Auto-process timing:
- Immediately: Scan and validate right after submission.
- After X Days: Introduce a delay before the auto-processing (useful for returns windows or fraud checks).
Example: Set to “After 7 days” if you want to wait until return periods expire before issuing points.
• When OFF: All receipts remain in a pending state until manually reviewed and approved or rejected by a team member.
Advanced Options
Expand Advanced Options to configure additional controls around validation, delay, and limits.
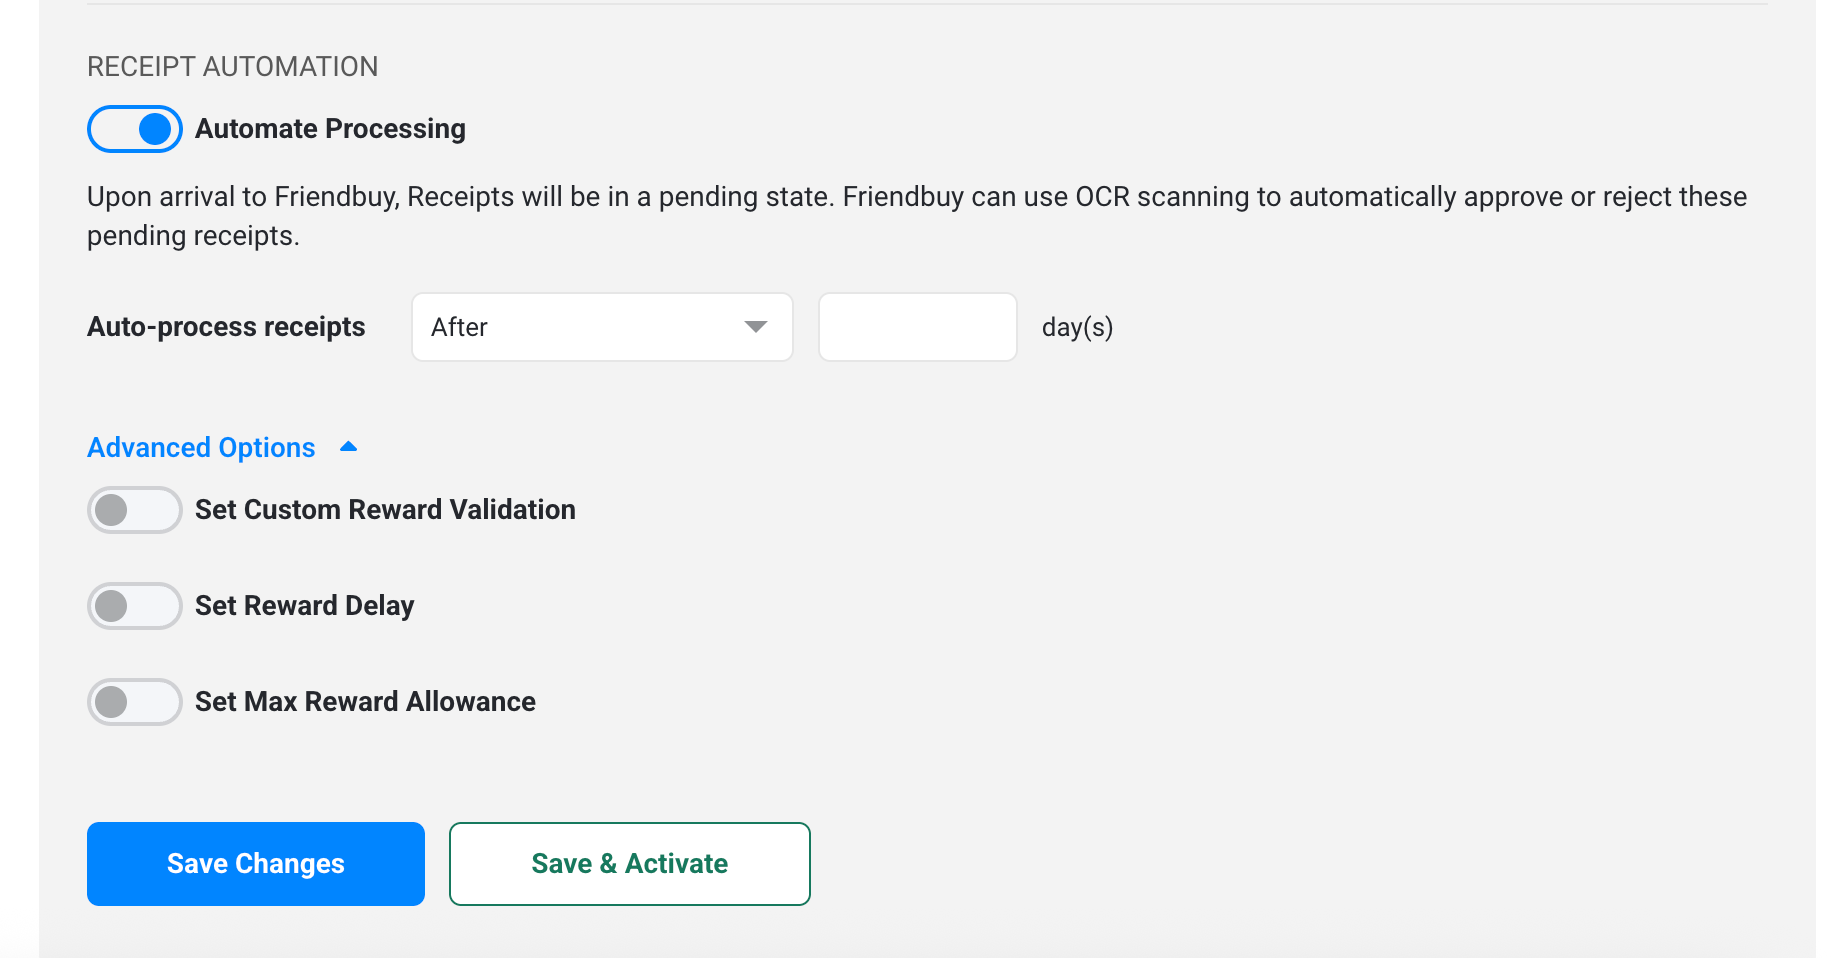
Option | Description | Use Case |
Custom Reward Validation | Allow Friendbuy to hit a URL endpoint to validate the receipt upload for any custom reason | Account for item returns |
Reward Delay | Delays the issuance of points after a receipt has been approved (automatically or manually) | Delay 7 days post-approval |
Max Reward Allowance | Set a limit on the number of rewards a customer can earn from receipt uploads. | Limit to 10 |
Viewing & Managing Uploaded Receipts
This tab gives you a comprehensive view of all uploaded receipts submitted by loyalty program members. It’s a central hub to monitor submission status and view receipt details
Navigate to Loyalty > Receipts to view this information.
The receipt queue table shows: Order ID, Status, Customer, Purchase Date, Store, and Details. The Details column includes a View button and a ⋮ (three-dot) context menu with:
- View Details: opens the full receipt detail page
- Select Earning Event: opens a modal to choose the matching event without leaving the queue
- Approve
- Reject
Receipts that don't match any active earning event display a visible warning in the queue so they can be reviewed manually.
Receipt Information
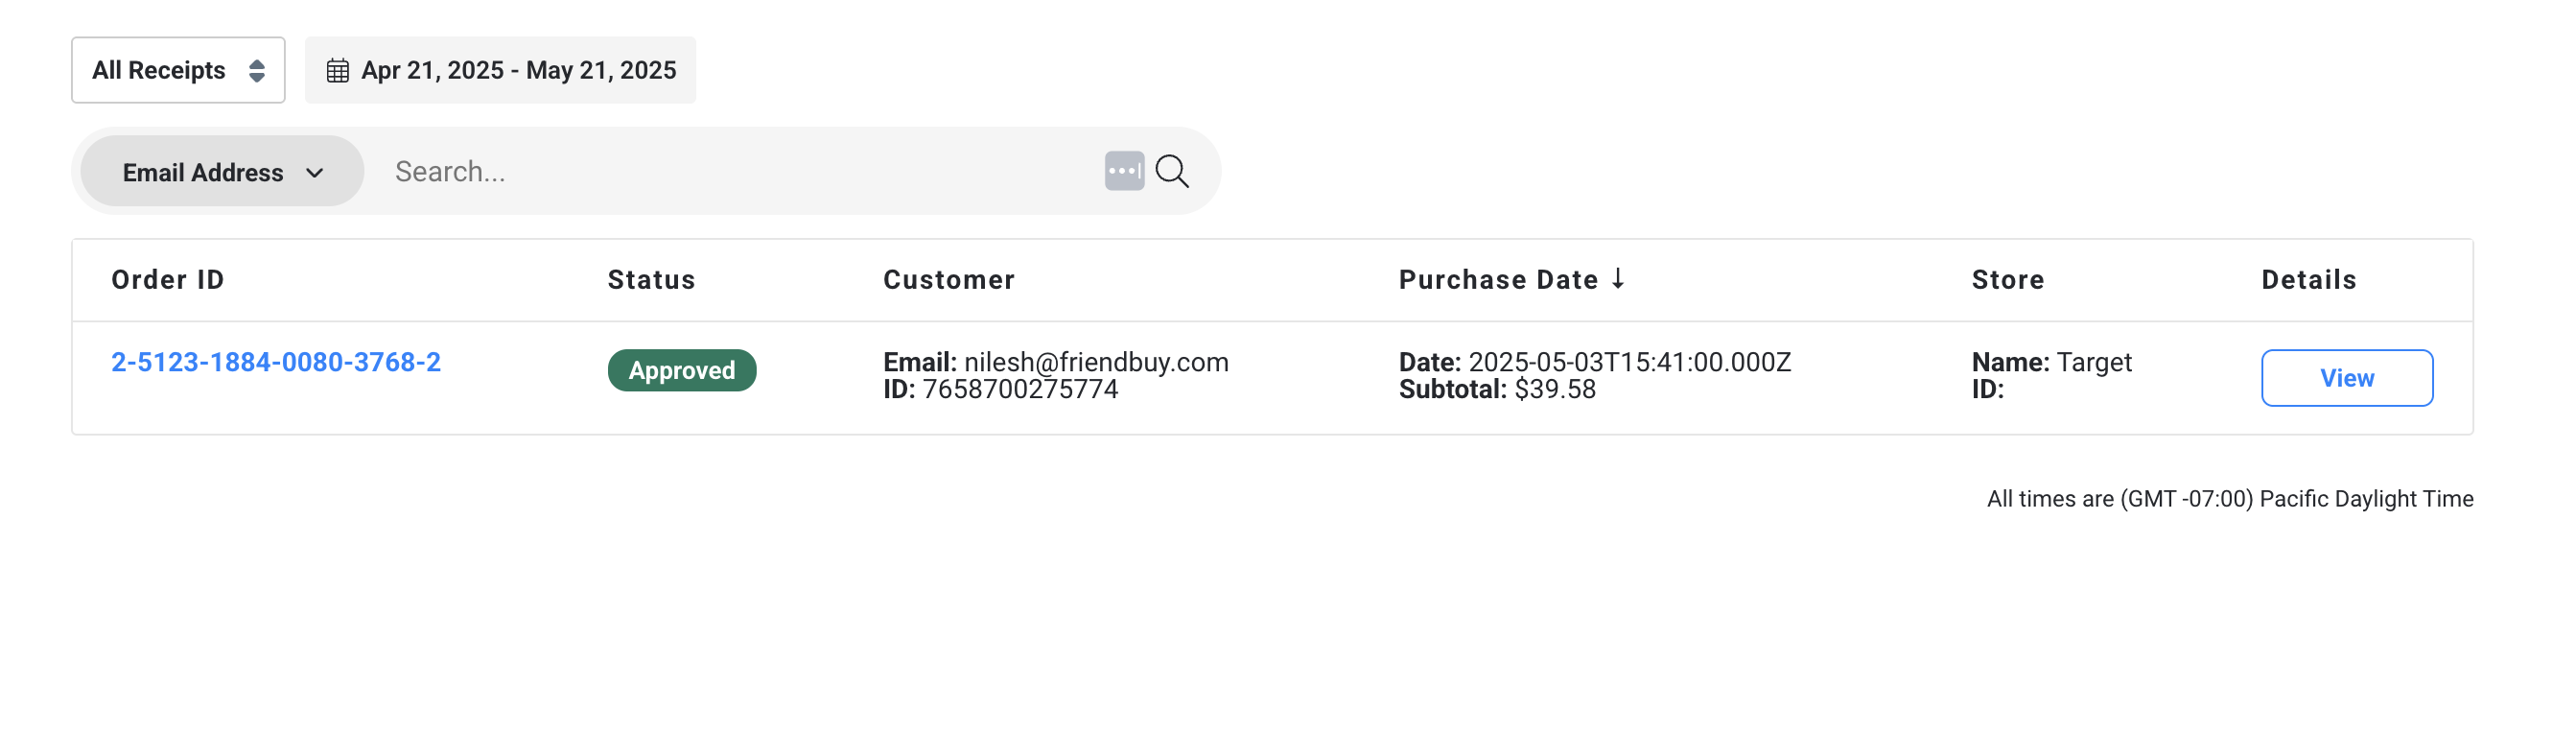
Column | Description |
Order ID | System-generated receipt identifier. Clickable for full detail view. |
Status | Displays the processing state: • 🟢 Approved• 🔴 Rejected• 🟡 Pending |
Customer | Customer’s email and unique Friendbuy ID. |
Purchase Date | Parsed from the uploaded receipt. Helpful for identifying anomalies or filter-based logic. |
Store | Name and optional Store ID from the receipt. |
Details | “View” button to access full receipt content. |
Filters & Search:
- Date Filter: Specify a time range to view receipt activity (e.g., last 30 days).
- Search by: Email address, order ID, or other metadata for quick lookup.
View Receipt Details
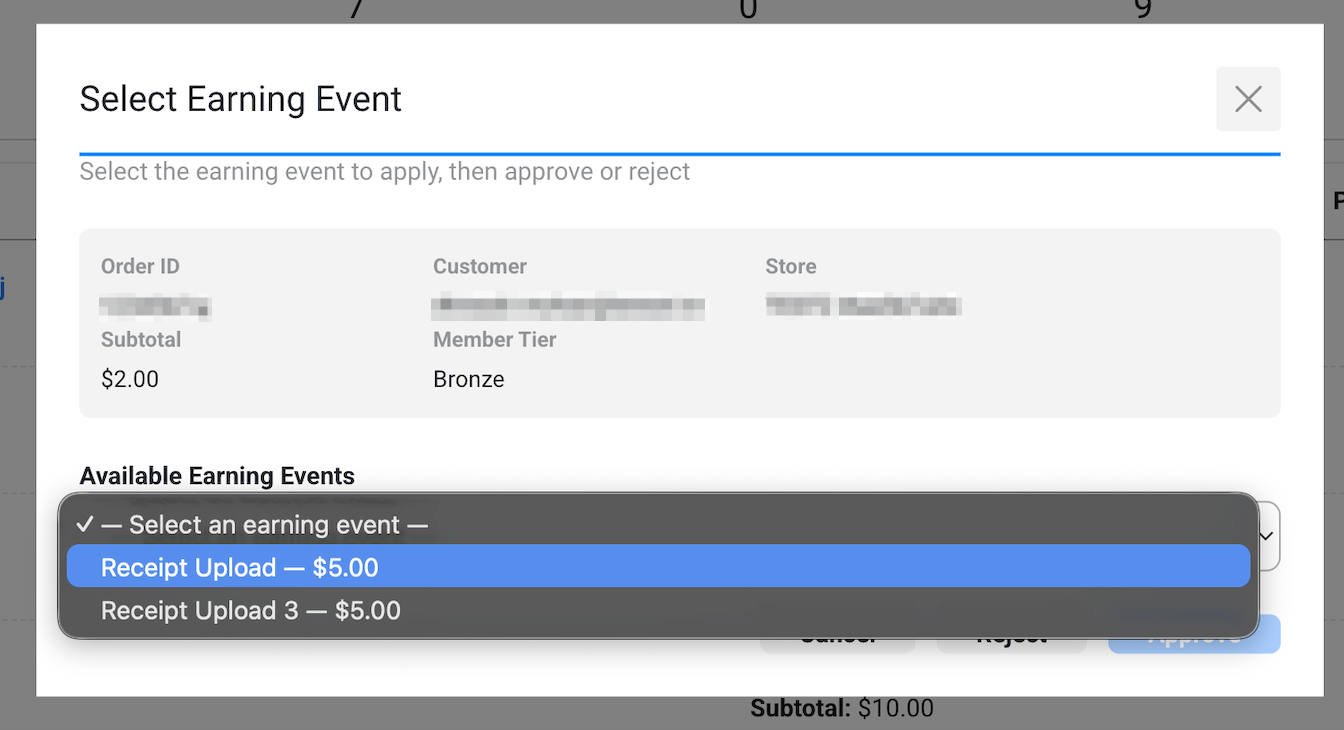
Example: Approved Receipt Detail
Clicking into an approved receipt shows:
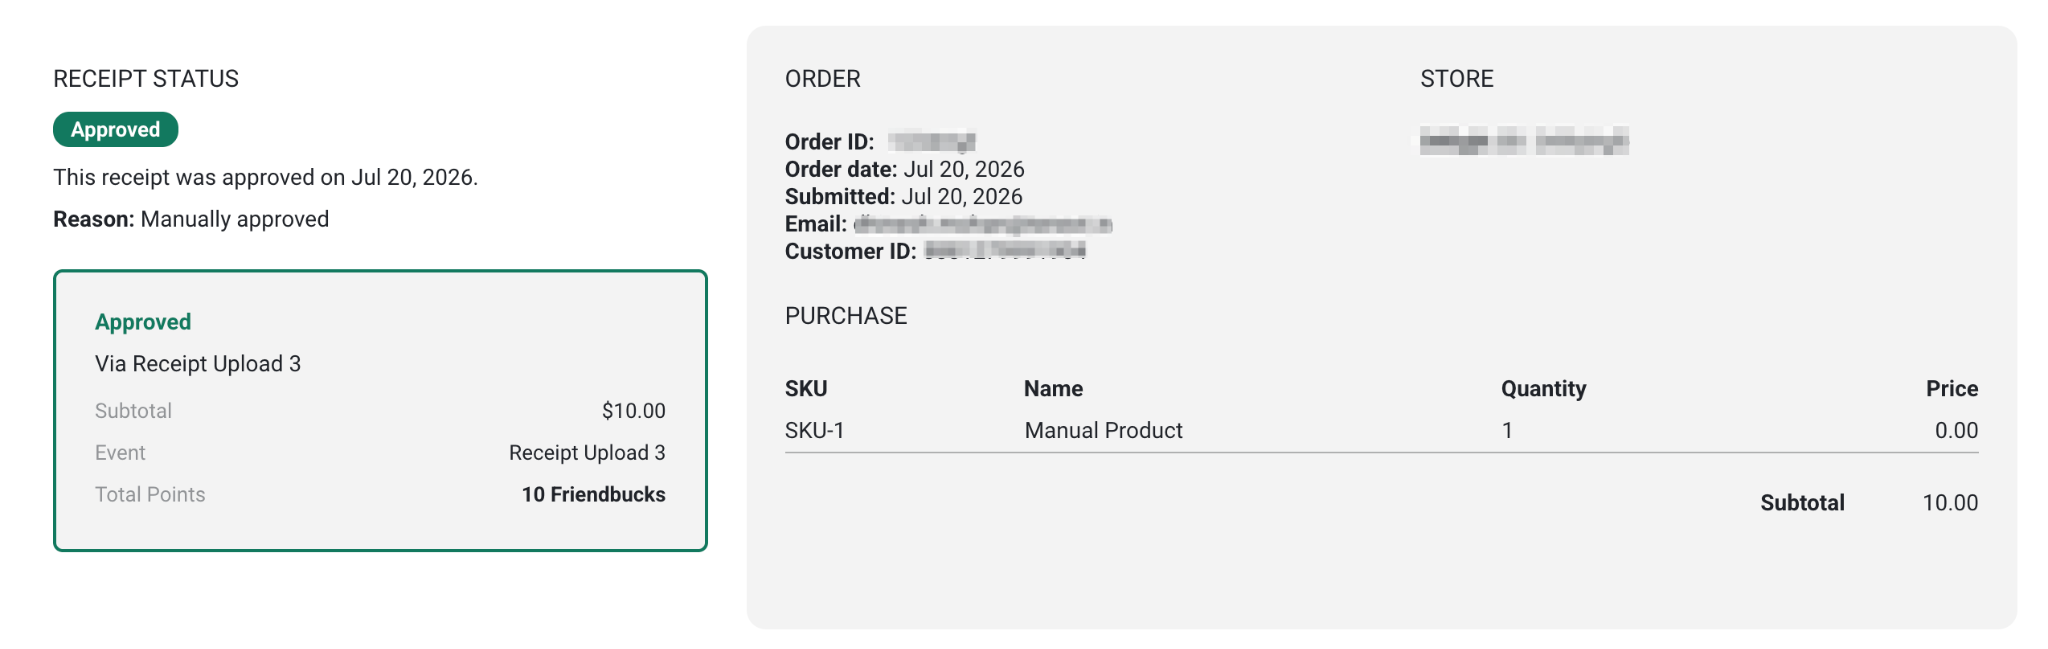
Left Panel:
• Receipt Status: Shows approval or rejection date.
• Earning Event: All active receipt scanning earning events, each showing the event name and estimated points for this receipt. The dropdown pre-selects the auto-matched event, you can override it by choosing a different active event. The option to approve is disabled until an event is selected.
• Image Link: View the submitted receipt image.
• Points Rewarded: How many points were issued, with a link to the relevant earning event.
Right Panel:
• Order Metadata:
• Order ID
• Order Date
• Submission Date
• Customer Email & ID
• Store Info: Parsed address from the receipt image.
• Itemized Purchase:
• SKU
• Item Name
• Quantity
• Unit Price
• Subtotal
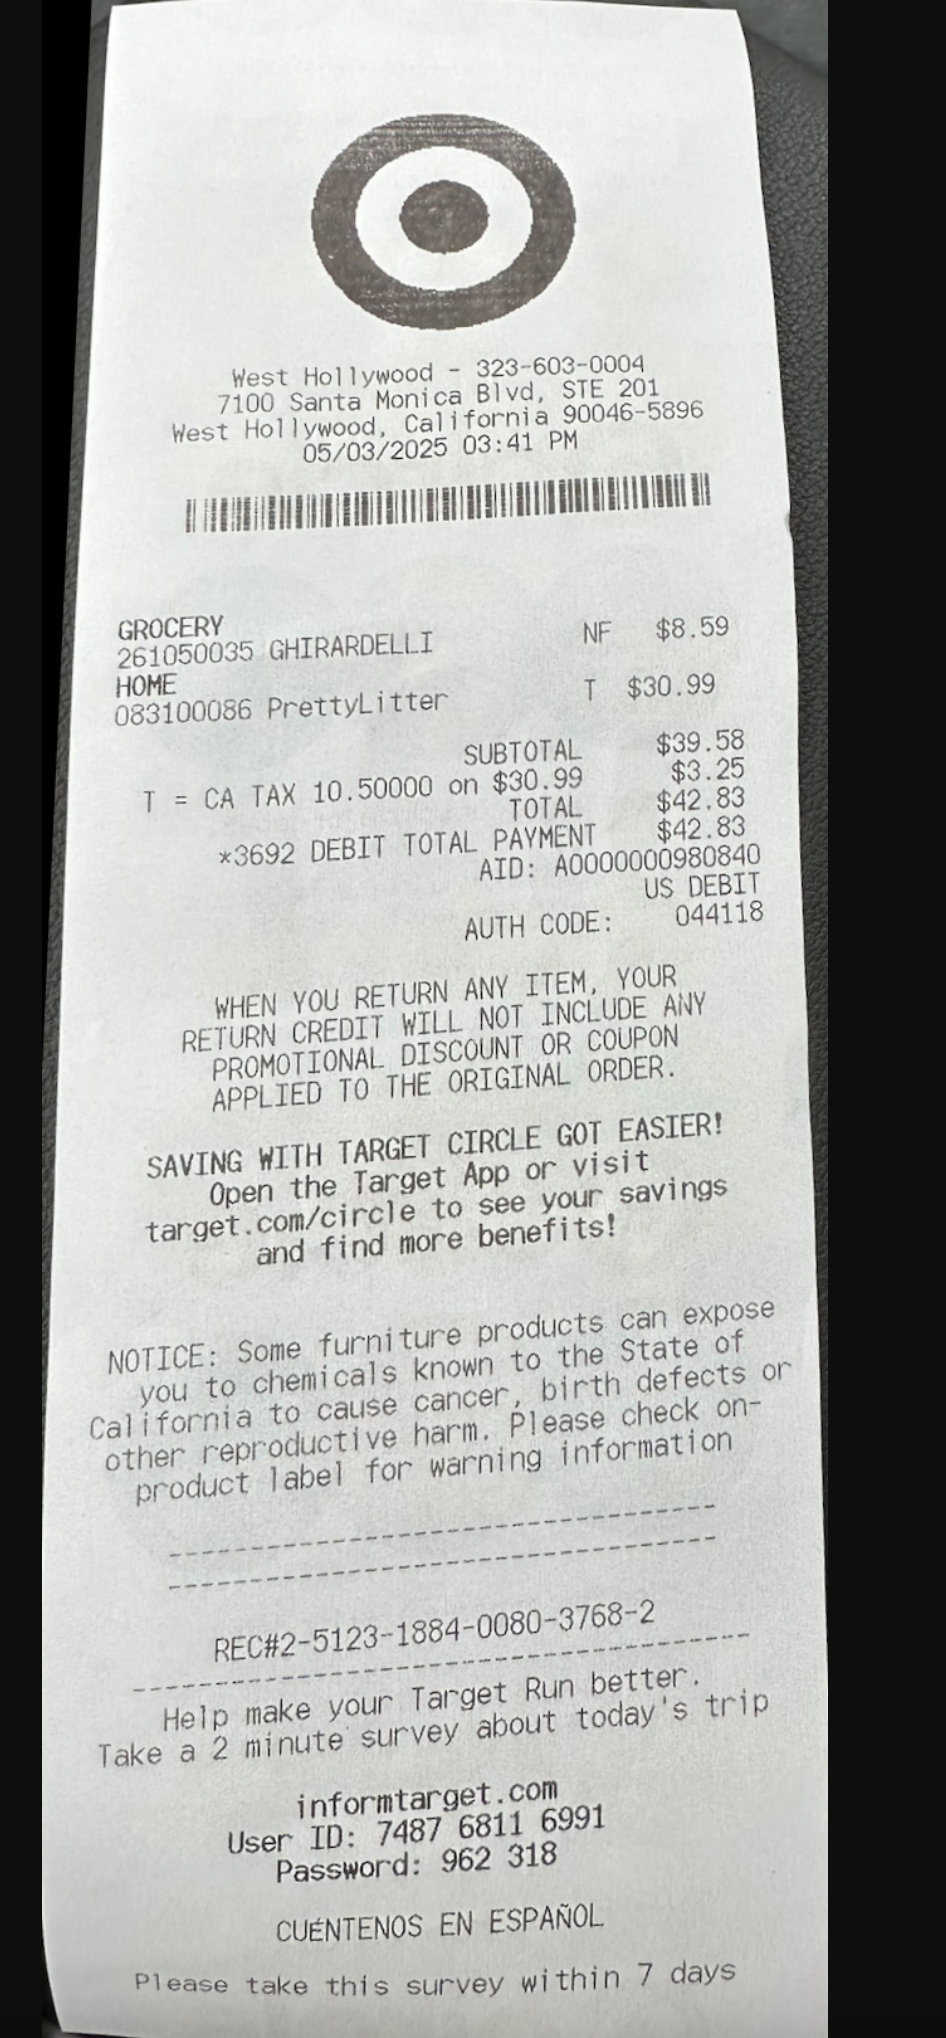
Example: Receipt Image
Friendbuy’s OCR engine extracts data from uploaded receipt images, including:
- Store name and address
- Purchase date and time
- Product names, SKUs, and prices
- Subtotals and totals
This data is used to:
- Trigger reward rules
- Validate event criteria
- Provide auditability
Manually Creating or Uploading Receipts (Customer Support Workflow)
If customers call / email in to customer service because they're having issues uploading their receipts, you can:
- Upload a receipt on behalf of a customer
- Create a receipt entry manually using key order details
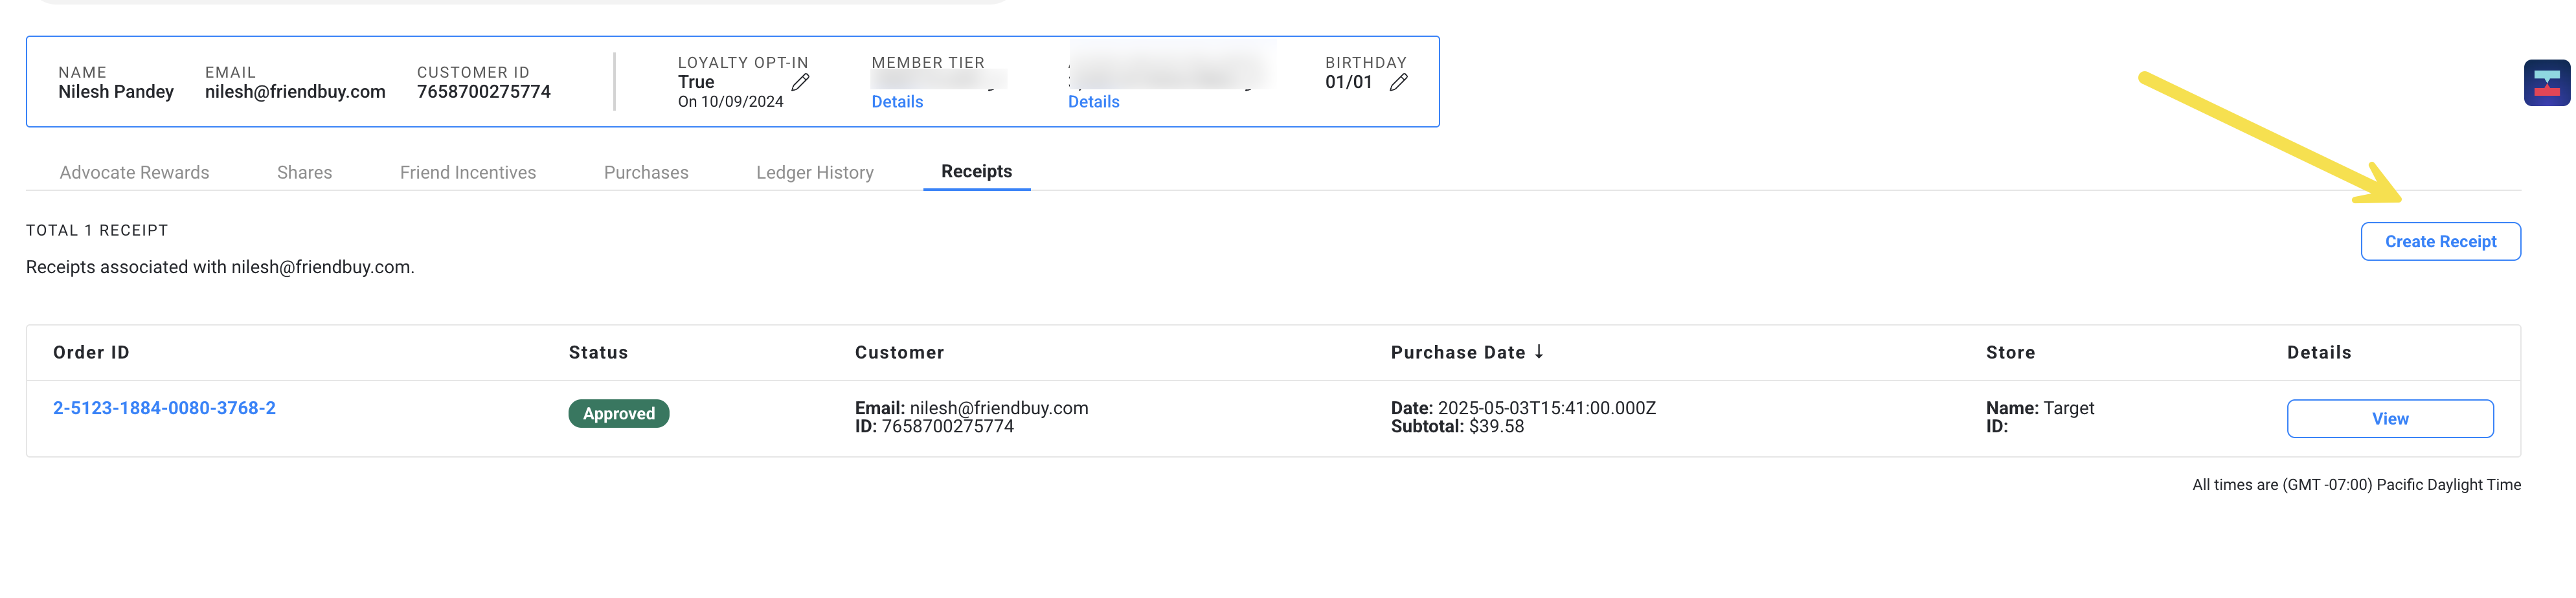
Locate the Customer in Friendbuy
- Navigate to Customer Service > Customer Look Up
- Search for a customer
- Click on the “Receipts” tab to see any past receipt submissions associated with that customer.
- Click the Create Receipt button
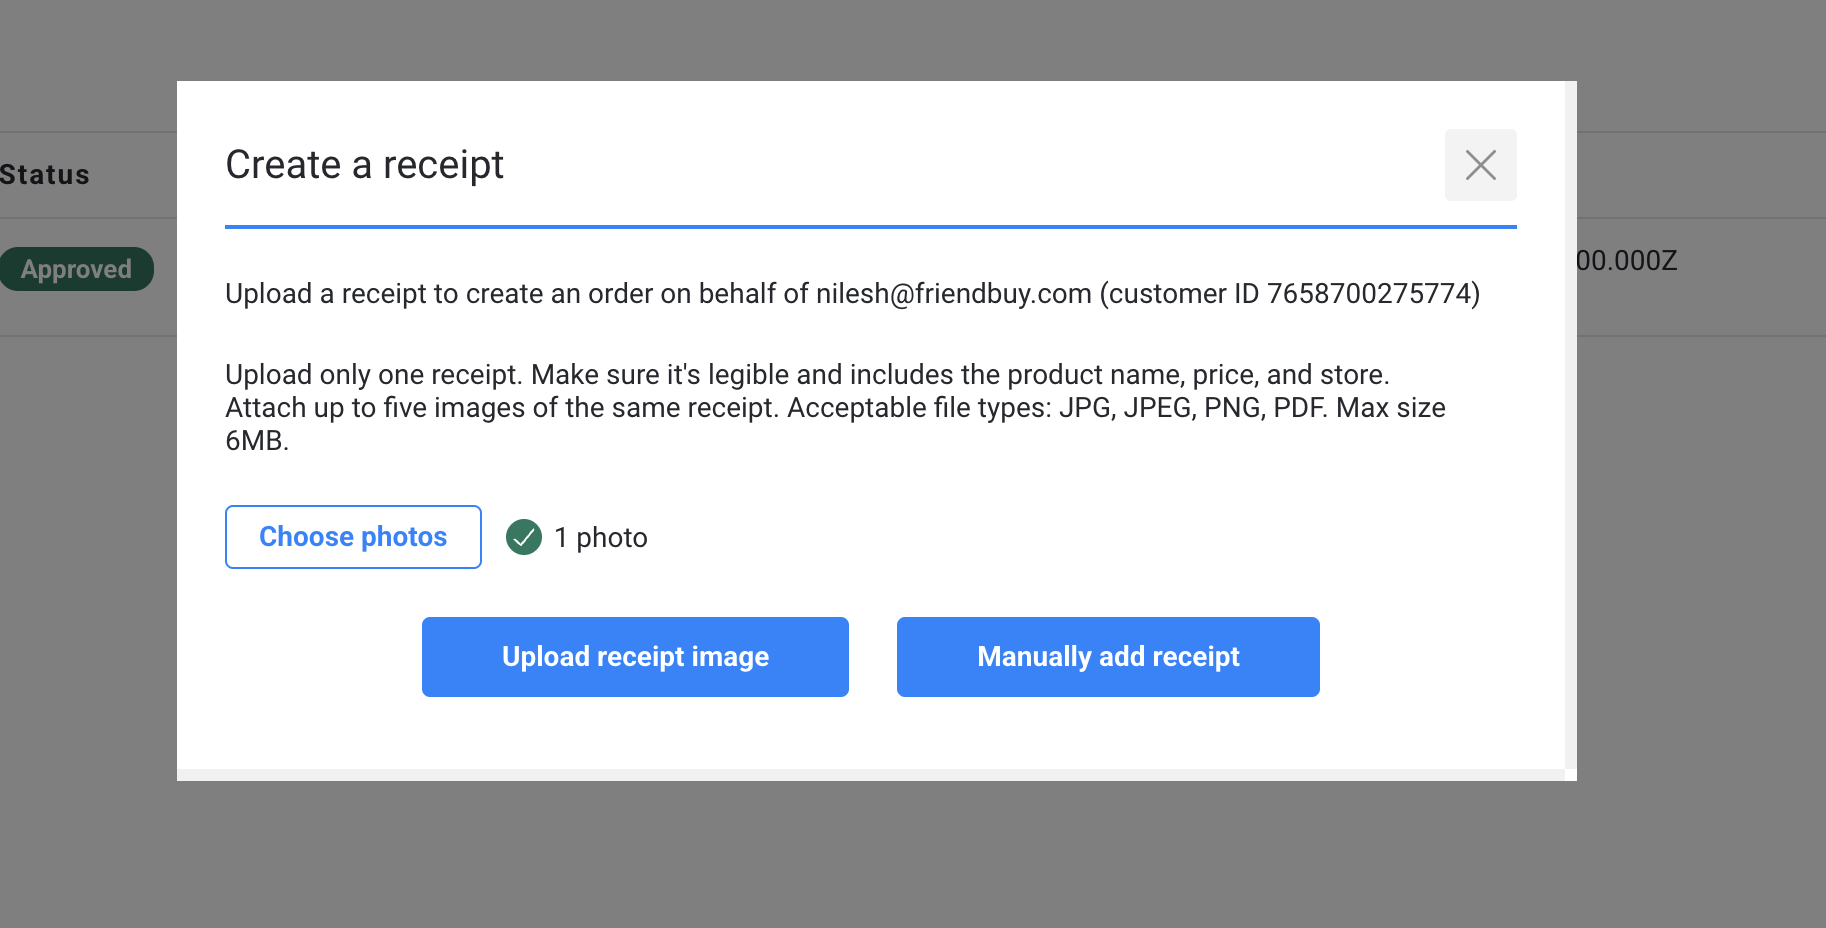
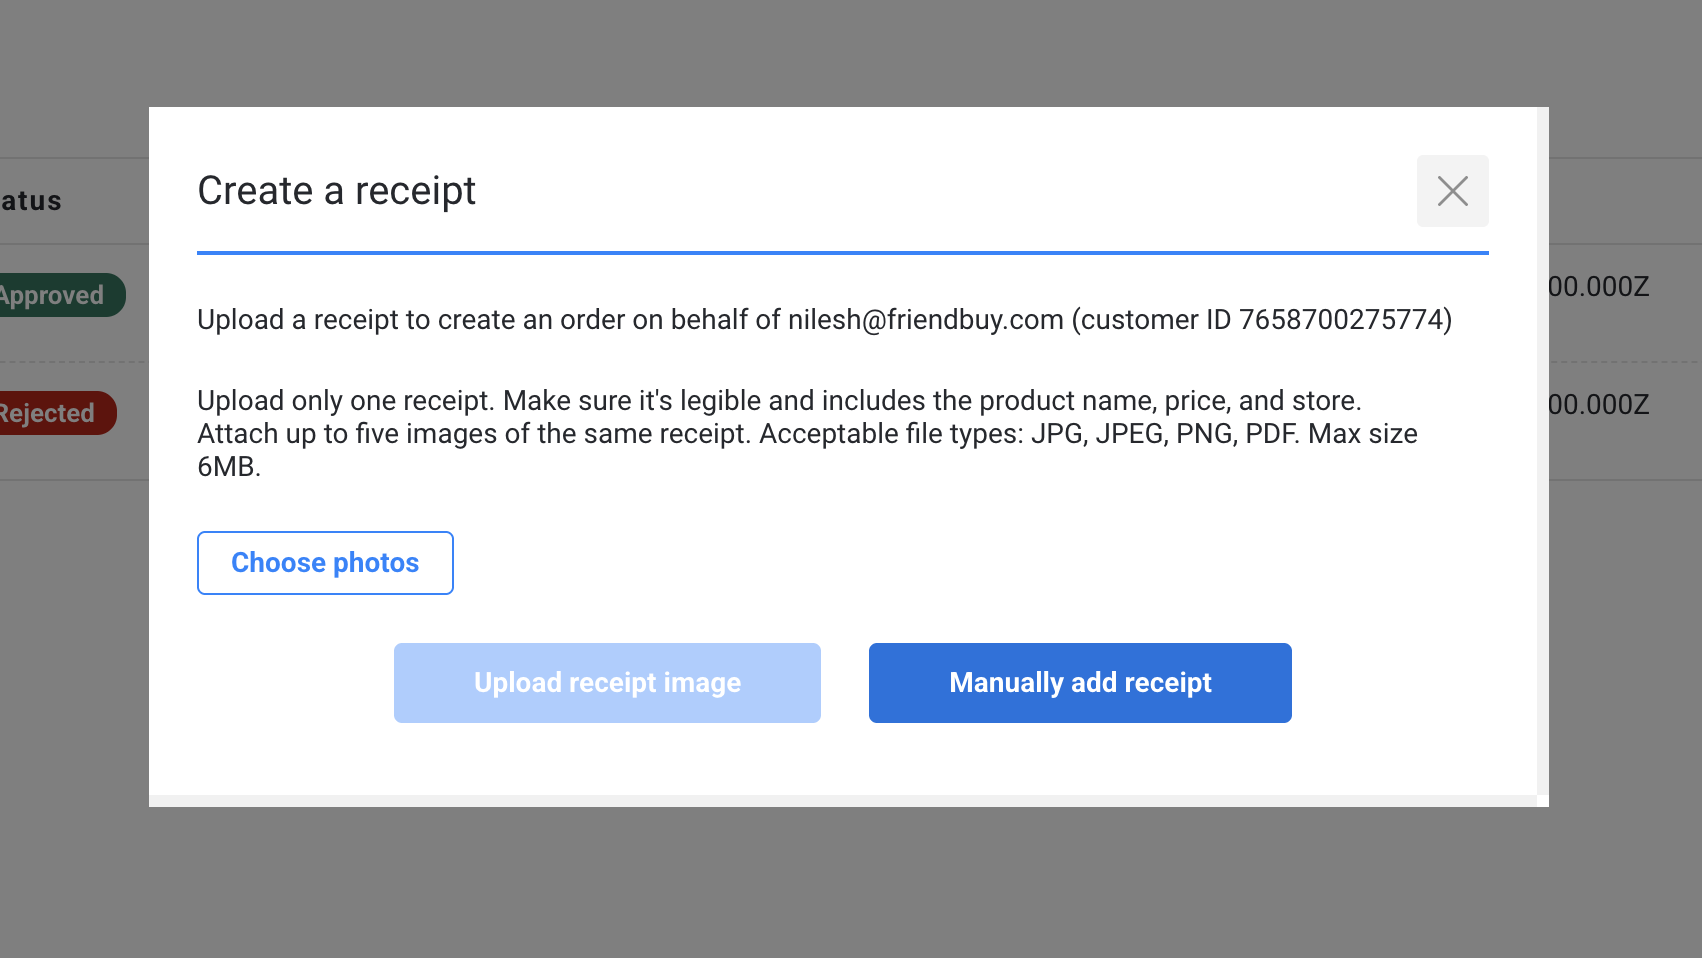
Option A: Upload a Receipt Image
- Choose “Upload receipt image”
- Upload 1–5 images of the same receipt (formats: JPG, JPEG, PNG, or PDF; max 6MB).
- Make sure the receipt is legible and includes:
- Product names
- Prices
- Store name
- Purchase date
- Click “Upload receipt image” to submit.
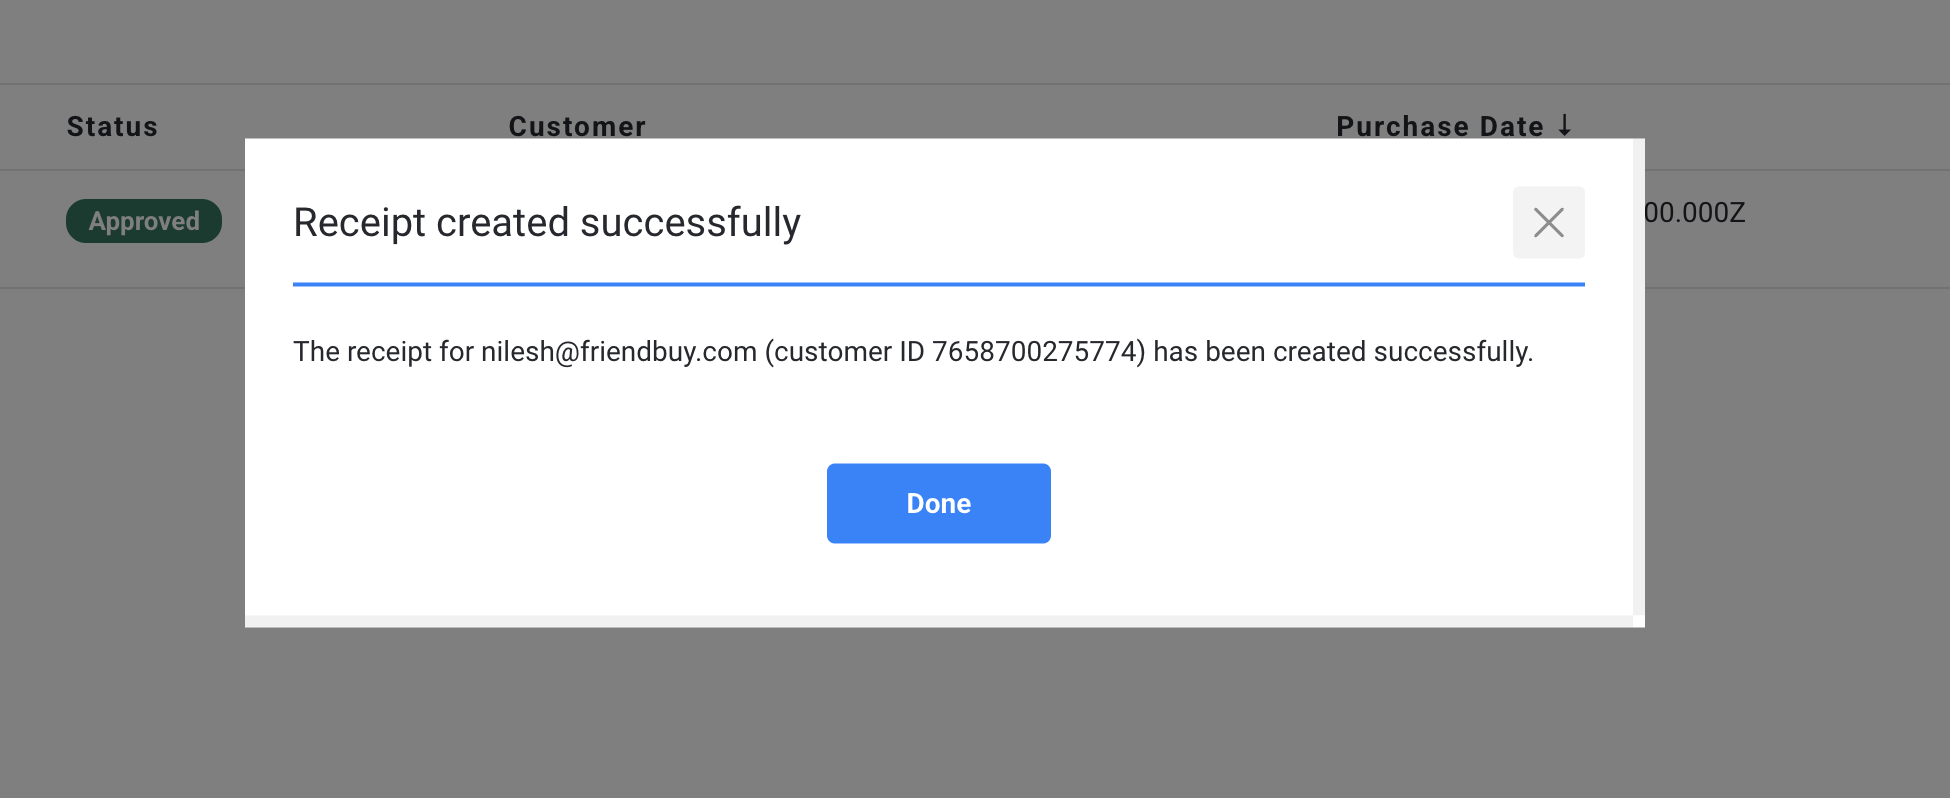
- A confirmation message will confirm that the receipt has been created successfully.
Click Choose photos button
Select Images You want to Upload

Click Upload Receipt Image Button
Receipt Creation Success Message
Option B: Manually Add Receipt Details
If a receipt image is unavailable or OCR fails, use manual data entry:
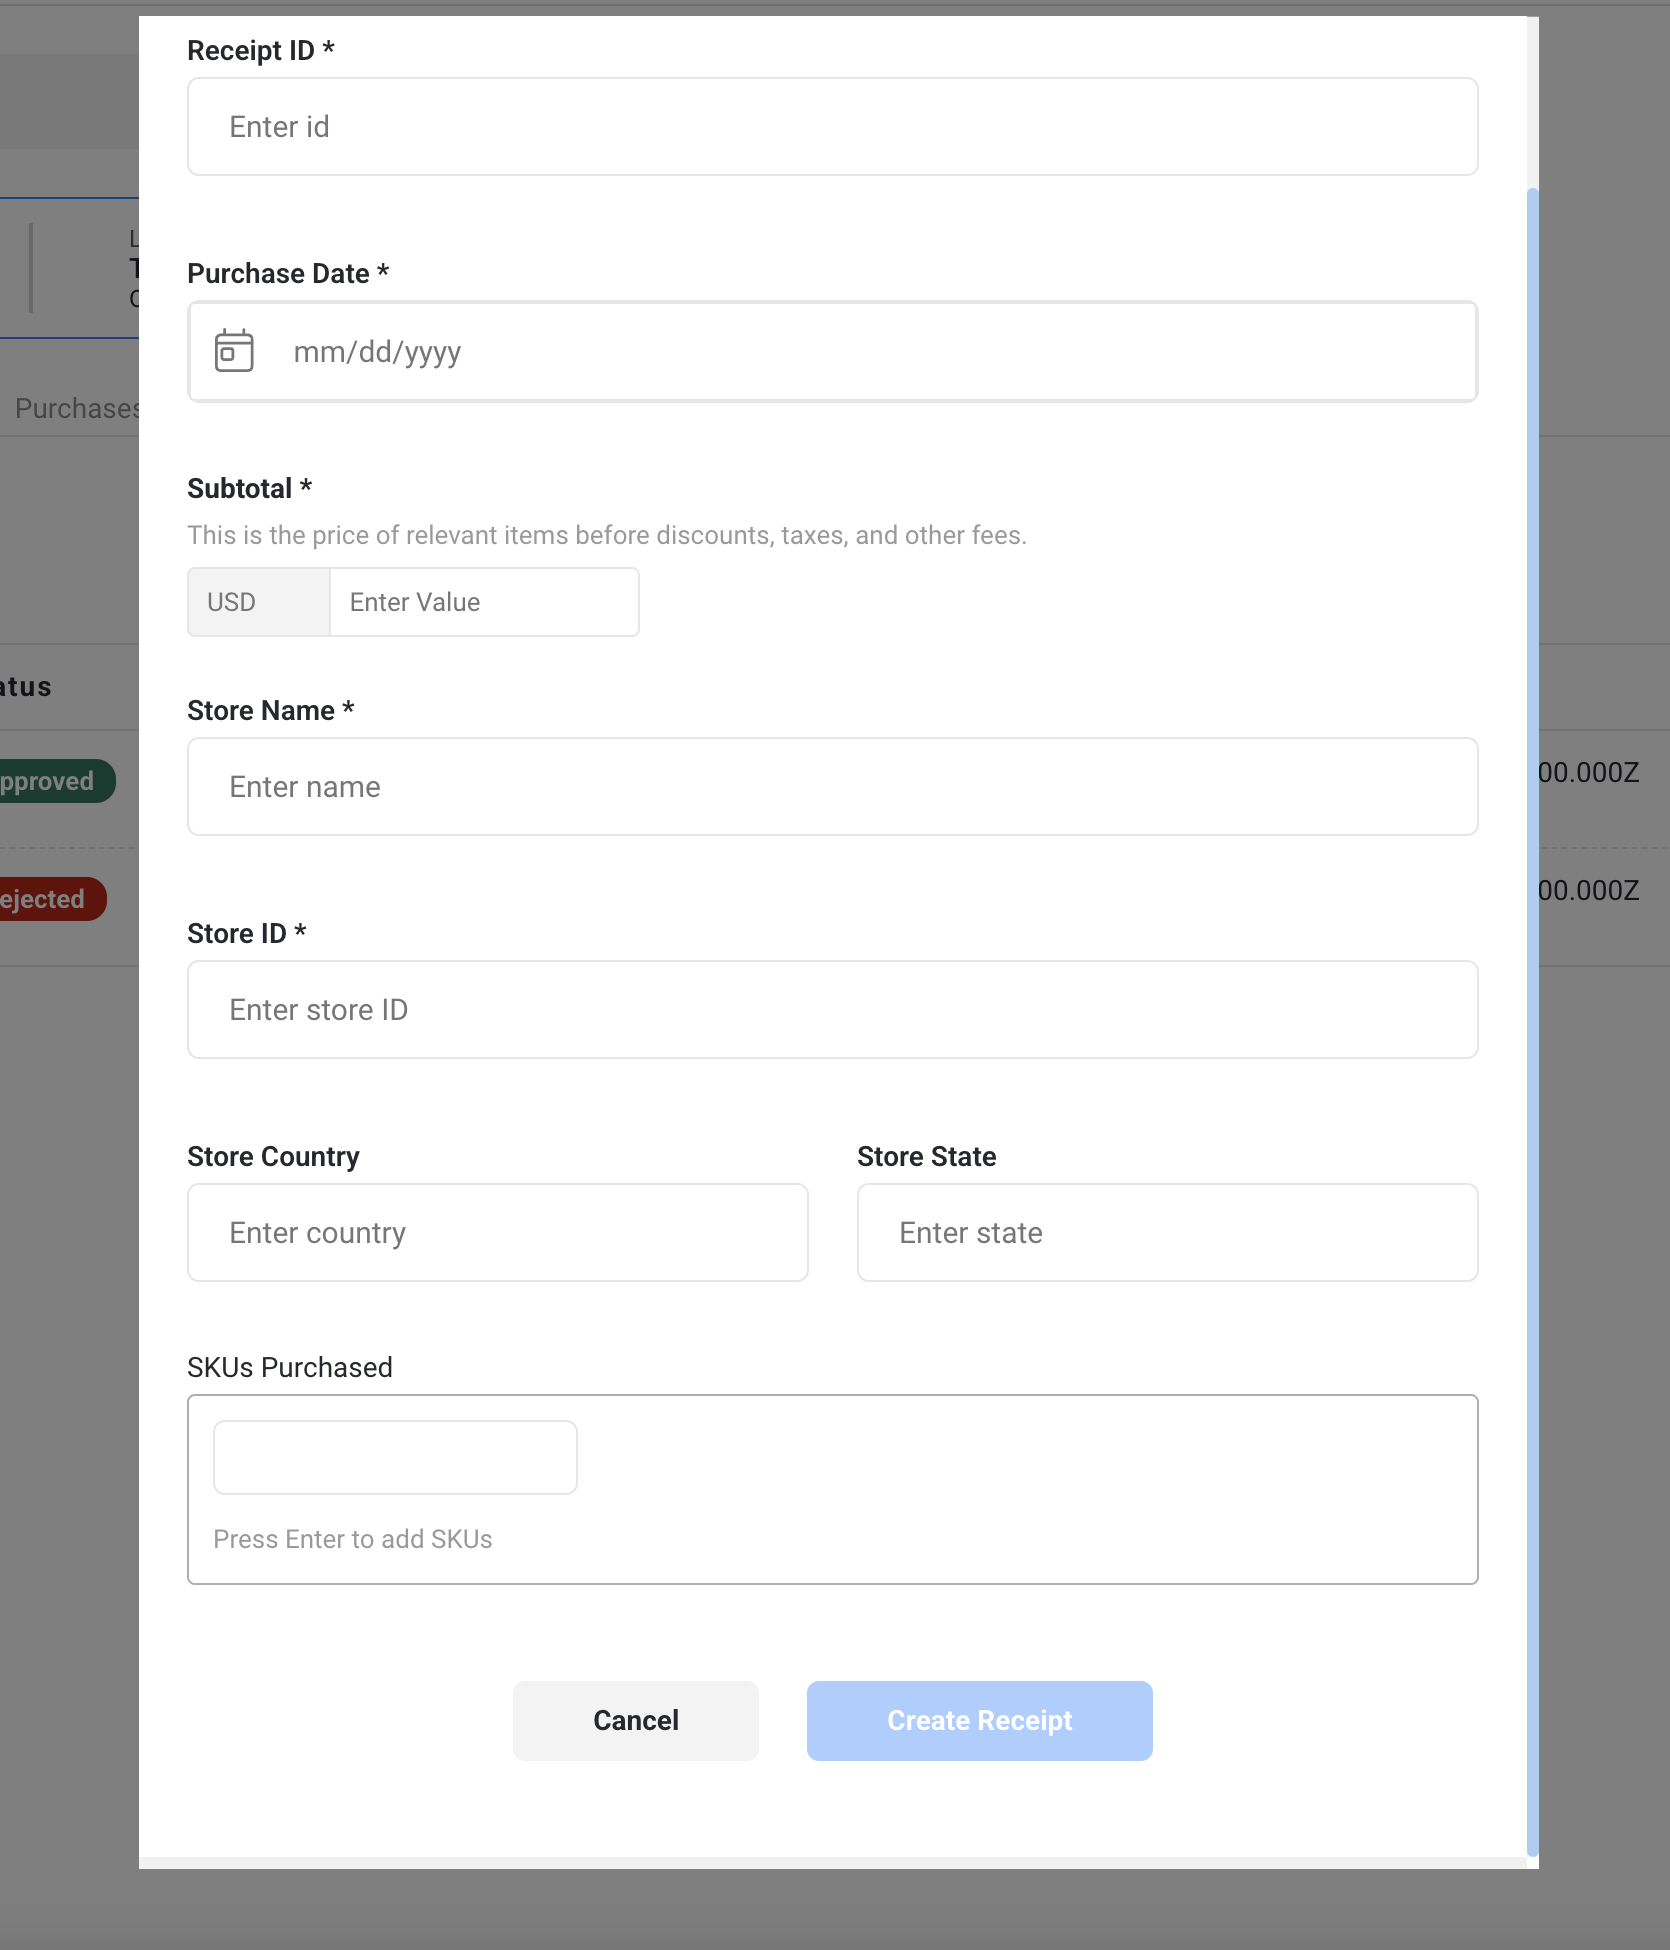
Create a Receipt
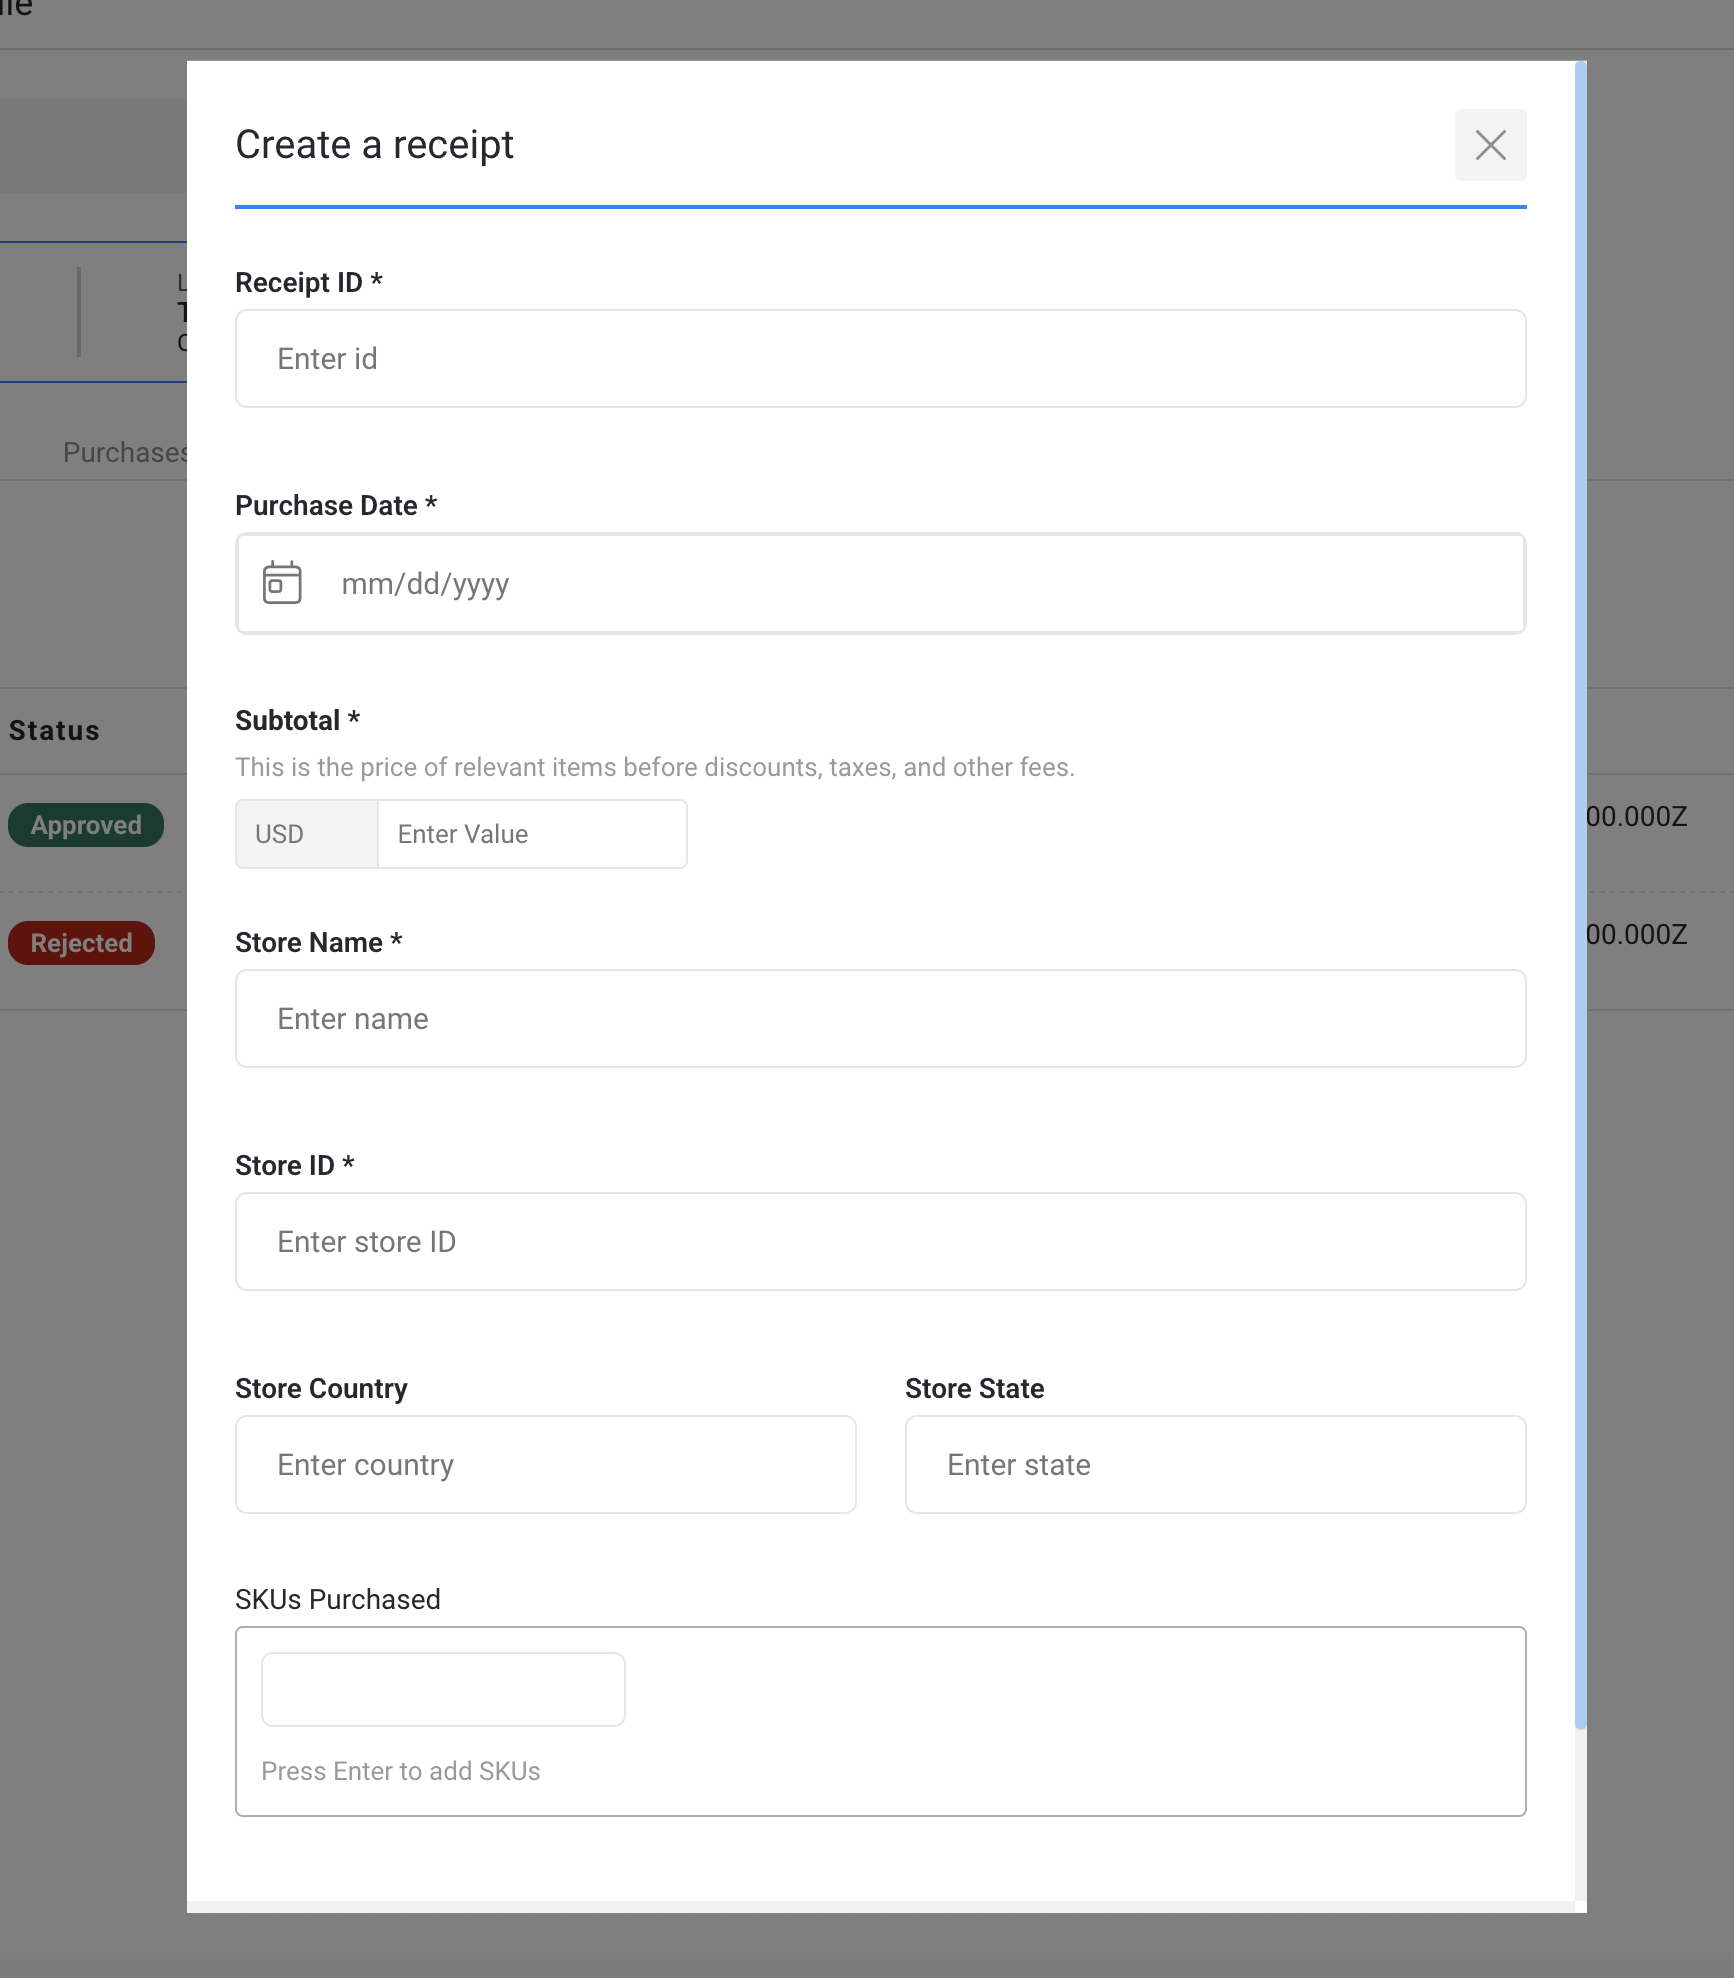
Required fields:
- Receipt ID
- Purchase Date
- Subtotal
- Store Name
- Store ID
- Store Country / State
- SKUs Purchased
Once completed, click Create Receipt to save the entry. This will then go through the same processing and validation workflow as standard uploads.
Best Practices for Support Teams
- Always confirm customer identity before uploading on their behalf.
- Ensure you're familiar with the reward criteria for approving points
- If uploading on behalf of a customer, ensure receipts meet the earning event rules to avoid rejection.
- Use manual creation when image upload is not viable.