Getting Started with Friendbuy
Getting Started with Referral
Plan Your Referral Program Implementation Team
Merchant SDK Setup with Google Tag Manager
How to Join Your Team on Friendbuy
Best Practices
Referral Program Placements
Friendbuy Referral Emails
Driving Referral Program Awareness
Referral Offer Strategies
Limited-Time Offer Promotions in Referral
Referral Contests, Sweepstakes and Giveaways
A/B Testing Best Practices
Account Management
How can I invite my team to the Friendbuy platform?
Managing Your Account Settings
How to Set Up and Change Your Email Sender
Referral Campaign Management
Widgets
How to Create a New Theme
How to Make Changes to a Theme
Widget & Email Image Specifications
How to Apply Theme Changes to a Widget
How to update a Widget or Theme to the latest version
How to Set Up a Ribbon
How to Set Up an Advocate Landing Page
How to Set Up a Friend Landing Page
How to Set Up a Post-Purchase Overlay
How to Set Up an Account Page Widget
How to configure your Terms & Conditions
How to Test a Widget
How to Set up a Self-Referral Overlay
How to Set Up a Customer Dashboard
How to Personalize Your Widgets with the Advocate name
Character Count Recommendations
Campaign Settings
How to Create a New Referral Campaign
How to set up Referral Code Personalization for PURLs
Setting Up an Advocate Reward
Setting Up a Friend Incentive
Shopify Coupon Codes Integration
How to Run an A/B Test
How to Change Your Referral Offer
Setting Up Max Clicks for Referral Links
How to Generate Personalized URLs (PURLs) through Our API
How to Generate Personalized URLs (PURLs) for Advocates
How to Configure Tiered Rewards
How to Archive a Referral Campaign
How to Duplicate Your Campaign
How to Set Up a Redirect for Limited Time Campaigns
How to set up Code Based Sharing
Code Banks
How to Create a New Code Bank
How to Generate Coupons in Bulk for Shopify
Setting Up Low Code Bank Notifications
How to Add Codes to an Existing Code Bank
Emails
Email Types for Your Referral Program
How to Add DNS Records for Email Sender Verification
How to Create, Edit, and Manage Emails
How to set up an Expiration Reminder email
How to Assign an Email to a Campaign
Referral Reward Store
Generate a QR Code for a Referral Link (API)
Loyalty Program Management
Uploading Data From a Legacy Loyalty Program
How to Set Up Purchase Based Member Tiers Program
How to Set Up a Points-Based Member Tier Program
How to Set Up Points Redemption Options
How to Set Up Shopify Coupon Code Integration in a Loyalty Earning Event
How to Set Up a Loyalty Opt-in CTA
Understanding the Loyalty Analytics
Manually Reward Customers via CSV Upload
Rolling Points Expiration Reminder Emails
Manually Opt a Customer In or Out of Loyalty
Receipt Scanning for Loyalty
How to Display Loyalty Points on a Product Detail Page (PDP)
How to Create an Earning Event
Cashback Rewards for Loyalty (Shopify Integration)
How to Configure an Earning Event in your Loyalty Program
How to set up expiration for Points or Account Credit
How to Create, Edit, and Manage Loyalty Emails
Integrations
Recharge Integration
Ethyca Integration
Klaviyo Integration
How to send Referral Links Post Product Review (Yotpo + Klaviyo)
How to Prompt a Referral After a Positive Review with Friendbuy and Trustpilot (via Klaviyo)
How to send one time emails with referral links through Klaviyo
How to Send Referral Links Post Positive Product Review (Okendo + Klaviyo)
How to Send Referral Links Post Purchase through Klaviyo
How to Promote Your Referral Program via SMS (Through Klaviyo)
How to Enable the Klaviyo Integration
How to Distribute a Reward To Your Loyalty Members on Their Birthday (Through Klaviyo)
How to Send a Customer their Loyalty Points Balance Through Klaviyo
How to Email Coupon Codes Through Klaviyo to Advocates and Friends After They Are Distributed by Friendbuy
How to Reward Customers for Providing a Review Through Yotpo via Klaviyo Through Your Loyalty Program
How to Send Reminder Texts to Redeem Loyalty Rewards Through Klaviyo
Upgrading to Klaviyo OAuth with your Friendbuy Integration
How to Reward Customers for Providing a Review Through Okendo via Klaviyo Through Your Loyalty Program
How to Trigger a Text to Remind Advocates to Redeem Referral Rewards (Through Klaviyo)
How to Trigger a Text to Remind Referred Friends to Redeem their Incentives (Through Klaviyo)
How to Send Coupon Codes through Klaviyo SMS to Advocates and Friends After They are Distributed by Friendbuy
How to Reward Customers For Subscribing to Klaviyo Emails and Texts Through Your Loyalty Program
How to Segment Customers Based on Tier Status in Klaviyo
How to Reward Customers for Providing a Review Through Stamped via Klaviyo Through Your Loyalty Program
Braze Integration
How To Enable The Braze integration
How to Send One Time Emails with Referral Links through Braze
How to Send Referral Links Post Purchase Through Braze
How to Email Coupon Codes Through Braze to Advocates and Friends After They Are Distributed by Friendbuy
How to Promote Your Referral Program via SMS (Through Braze)
How to Trigger a Text to Remind Advocates to Redeem Referral Rewards (Through Braze)
How to Trigger a Text to Remind Referred Friends to Redeem Their Incentives (Through Braze)
How to Send Coupon Codes Through Braze SMS to Advocates and Friends After They Are Distributed by Friendbuy
How to Prompt a Referral After a Positive Review with Friendbuy and Trustpilot (via Braze)
DataGrail Integration
Tango Card Integration
Cordial Integration
Segment Integration
How to Integrate Friendbuy as a Segment Source
How to set up the Segment Web-Mode (Destination Actions) Integration
Shopify Integration
How to Enable the Shopify Integration
Shopify Checkout Extensibility
Checkout Extensibility - Shopify Pixel Tracking
Shopify Theme App Embed
How Friendbuy Powers Loyalty Point Refunds with Shopify
How to Integrate Friendbuy with Shopify POS for Loyalty and Referral
Ordergroove Integration
Kustomer integration
Tremendous Integration
Iterable Integration
Trigger a Direct Mail Campaign to Drive Referral Program Awareness (Friendbuy x Iterable x Poplar)
How to Enable the Iterable Integration
How to Automatically Text Referred Friends their Coupon Code with Iterable Journeys
How to Prompt a Referral After a Positive Review with Friendbuy and Trustpilot (via Iterable)
Increase Referral Program Awareness with a Dedicated Email Blast through Iterable Journeys
Attentive Integration
Send a Triggered Text to Prompt a Referral After a Positive Review with Attentive and Okendo
Automatically Prompt a Referral Post Purchase in Attentive
Send Referral Program Text Messages Through Attentive
How to Text Coupon Codes to Advocates using Attentive Journeys
Make it Easy for Advocates to Refer by Sending Their PURL Through SMS using Attentive Journeys
How to Send Advocates a Reminder Text to Redeem Their Coupon Codes through Attentive Journeys
How to Send Referred Friends a Reminder Text to Redeem Their Coupon Codes through Attentive Journeys
How to reward Loyalty Members for signing up for Attentive text messages and emails
How to Include a Customer's Loyalty Points Balance in an Attentive Text
How to Send a Coupon Code to a Referred Friend using Attentive Journeys
How To Enable the Attentive Integration
Salesforce Commerce Cloud
Fivetran Integration
How to Integrate Your Friendbuy Loyalty and Referral Program with Rise.ai to Issue Stackable Gift Cards and Account Credit
Friendbuy x Postscript Integration
Friendbuy + Stripe Integration (Referral Program)
Fraud Prevention
How to Block a Referral Code
How to Block an Email Address
Fraud Settings and Business Rules
Configuring a Global Reward Allowance
Configuring a Referral Link Fallback URL
How the Similar Email Address Fraud Check Works
Customer Service Portal
How do I check the status of a referral?
How to Manually Add or Remove Credit / Points to a Customer's Account
Why was my customers reward rejected?
The Referred Friend put in their email address but didn’t get their coupon code. How do I find this?
Resend Reward Email
Override a Rejected or Pending reward
How to Search for a Customer Profile
How to Search for a Customer’s Referral Link in the Friendbuy Platform
How to create a Manual Referral
Why didn't the Advocate receive a Reward for a successful referral?
Reasons for Rejected Advocate Rewards and Friend Incentives
Analytics & Reports
Performance Overview
Reports
Mark purchases as "Test" to maintain clean reporting
Top Advocates Report
Scheduled Reports
Account Credit or Points Statement Export
Exporting Reports from Friendbuy
Email & SMS Report
Advocate Rewards Report
Purchases Report
Friend Incentives Report
Understanding the Codes Report
Dashboards
Referral Performance Analytics Dashboard
Advocate Referral Widget Source Tracking
Referral Analytics Dashboard Overview Metrics
Advocate Reward Email Analytics
Loyalty Email Analytics
Common FAQs
What does Fraud Protection do?
How to Access my Billing Information
What is a typical referral flow?
How to Apply Theme Changes to a Widget
Difficulty downloading reports after you receive an export email?
What are Fraud Checks, Tier Checks, and Rules Checks in the Rewards Report?
How do I change my password?
What is a self-referral redirect URL?
What do the Reward Statuses and Definitions mean?
How to Create a New Theme
What is a Friend Widget?
How are Conversions Tracked in Friendbuy?
A Glossary of Terms
How long is the Referred Friend attribution window
What are some common scenarios, and how do I troubleshoot them?
Developer Documents
- All Categories
- Referral Campaign Management
- Emails
- How to Create, Edit, and Manage Emails
How to Create, Edit, and Manage Emails

Get a unified view of all your Friendbuy emails for each campaign within the Emails section. It's easy to create new drafts and make edits by managing all your emails in one place. Once an email is ready to be used, assign it to a campaign in the Referrals section.
Referral Email Table
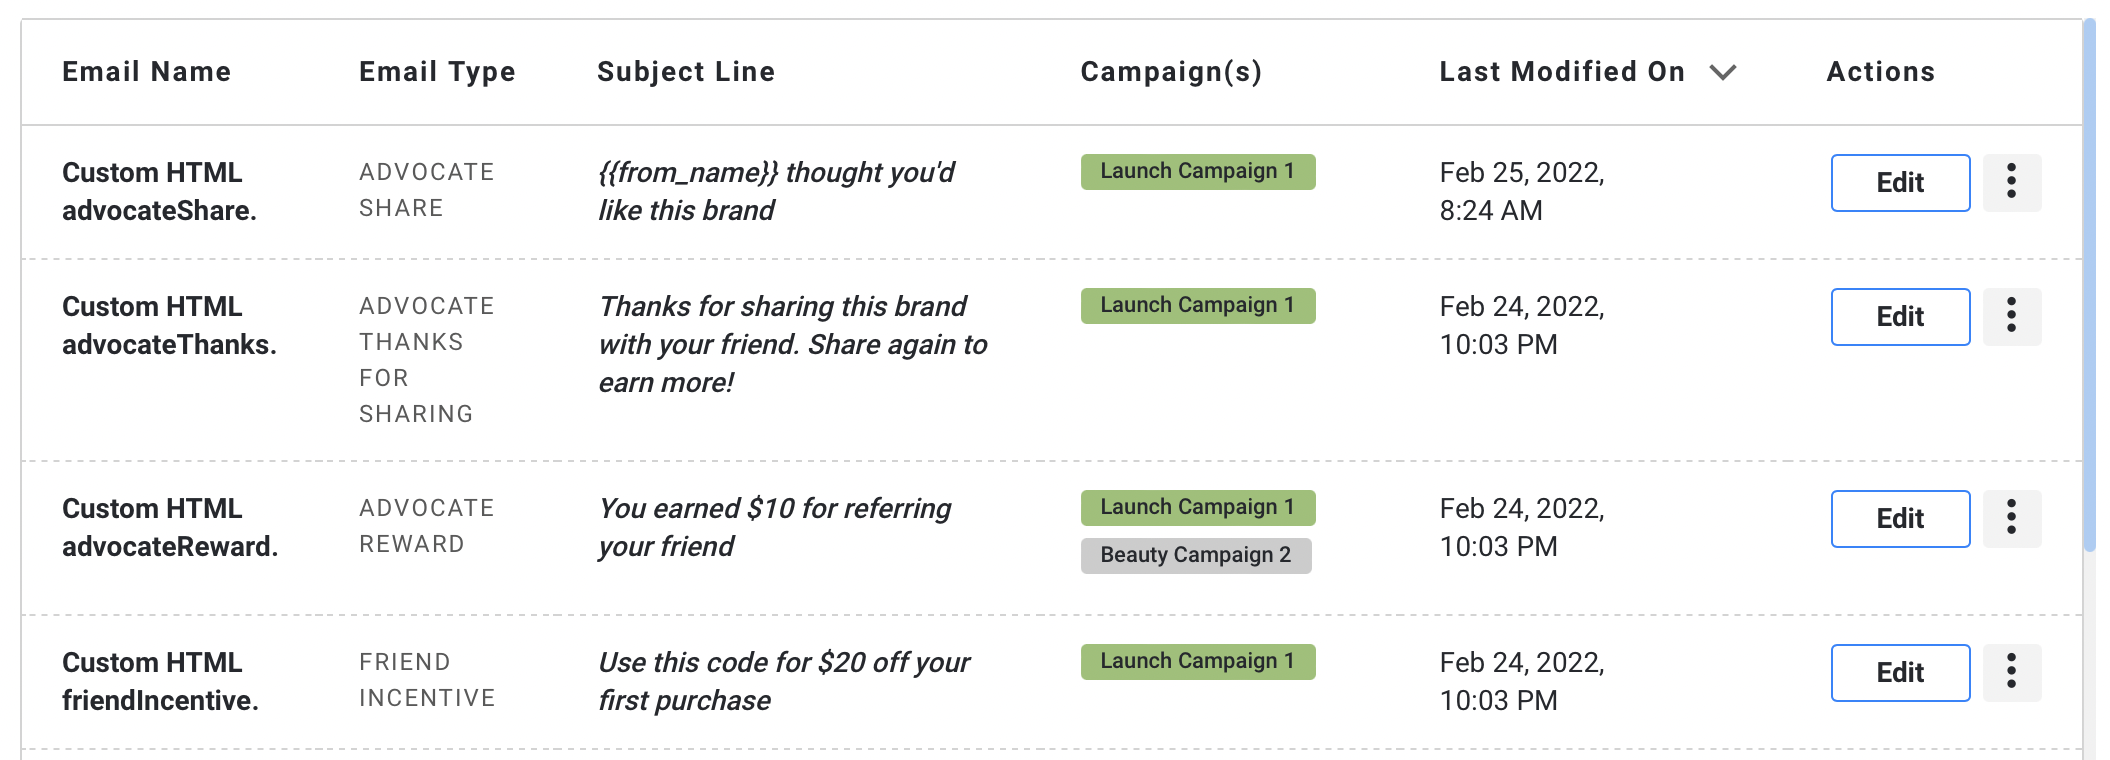
Access all your referral campaign emails in one spot to see which emails are assigned to which campaigns. Remember to enter a descriptive and unique Email Name to help keep track of new versions. Each email has a specific Email Type that is choosen when first creating the email. Learn more about each email type and creating a new email below.
Campaign(s)
When an email is assigned to a referral Campaign, the campaign name will be displayed in the table with either a green tag (indicating the campaign is Active) or gray tag (indicating the campaign is a Draft). Emails can be assigned to multiple campaigns.
Editing
Click the Edit button in the table to open the email editor to make content and design updates. Saved edits will be published live to any associated campaign(s).
Actions
Click the three dots menu under the Actions column to see an email Preview, Send Test Email to your inbox, Duplicate an email to make a copy, or Archive / Unarchive an email to hide / show it in the table.
Sorting
Use the Last Modified On column to check the date and time the email was last edited. By default, emails will be sorted with the most recently modified at the top of the table.
Creating an Email
- Click Create an Email
- Select an Email Type you plan to use in your Referral Campaign. Note: Email Type cannot be changed after an email is created
- Enter an Email Name, Subject Line, Text Body, and HTML Body in the email editor. Note: Email Name must be unique. Click Show Merge Variables to see the list available for the Email Type you selected. You can include merge variables in any of the email fields to customize your messaging, which will then update with the corresponding value when it is sent to a customer.
- Optionally, you can Preview or Send Test Email to yourself within the email editor. You will also have the option to do this after the email is created.
- Click Create Email to add it to the Emails table. Note: Newly created emails will start off as a draft and will not be assigned to a campaign.

Editing an Email
All email editing must be done from within the Emails section - not within the Campaign section.
In the Emails table > click Edit to open the email editor. At the top, you can see a Campaign tag(s) if the email is currently assigned to any Campaign(s). Active campaigns are shown with a greeen tag, Draft campaigns are shown with a gray tag. You can also see the Created On date and Last Modified date for each email.
Editing an email assigned to a campaign will publish the changes live to the campaign immediately.
When using Merge Variables, be sure to copy and paste the variable exactly as it is shown in the list. Variables are different depending on the Email Type so be cautious not to use a variable which is not listed.

Duplicate an Email
In the Emails table > click the three dot menu > select Duplicate
Duplicated emails will open in the email editor with a copy of the same Email Type, Email Name, Subject Line, Text Body, and HTML Body from the original email. Remember to rename the newly duplicated email to keep organized!
The duplicate email will start off as a draft and will not be assigned to a campaign.
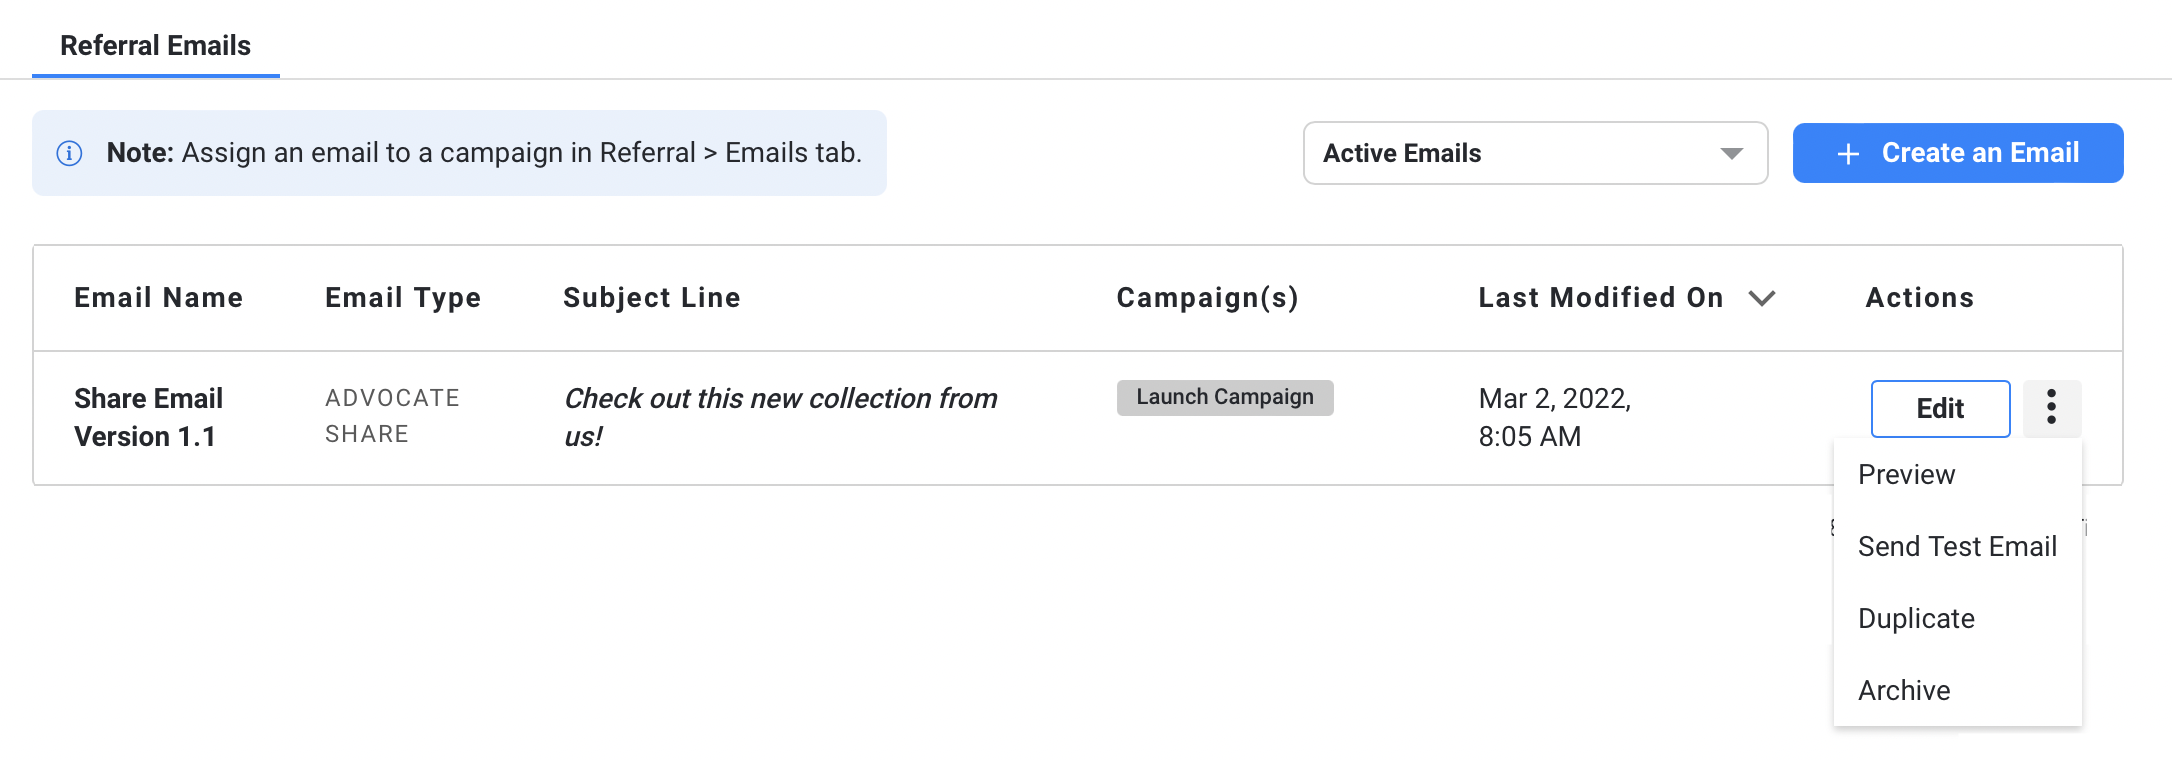
Preview an Email
In the Emails table > click the three dot menu > select Preview
Email previews will display the HTML as it will appear on Desktop view in a customer's email client, including the From Name, From Email, and Subject Line.
The From Name will be the Company Name set up in the Account > Email Sender settings. Learn more about Email Sender settings here. Note: Advocate Share emails appear they are coming from the Advocate (on behalf of the company), so the Advocate's Name will be dynamically inserted when sent to a customer.
Send a Test Email
In the Emails table > click the three dot menu > select Send Test Email to trigger an email to your account's inbox.
Note: Merge variables will not be populated in the test email.
Archive or Unarchive an Email
In the Emails table > click the three dot menu > select Archive or Unarchive
Archived emails will only be visible in the table when using the filtering option above the Emails table. Archived emails will appear with their name grayed out and cannot be edited or duplicated. You can still preview or send a test email using the three dot menu.
Note: If you archive an email that is associated to a Draft campaign, it will not Archive the campaign itself and vice versa. Emails that are assigned to an Active campaign cannot be Archived.
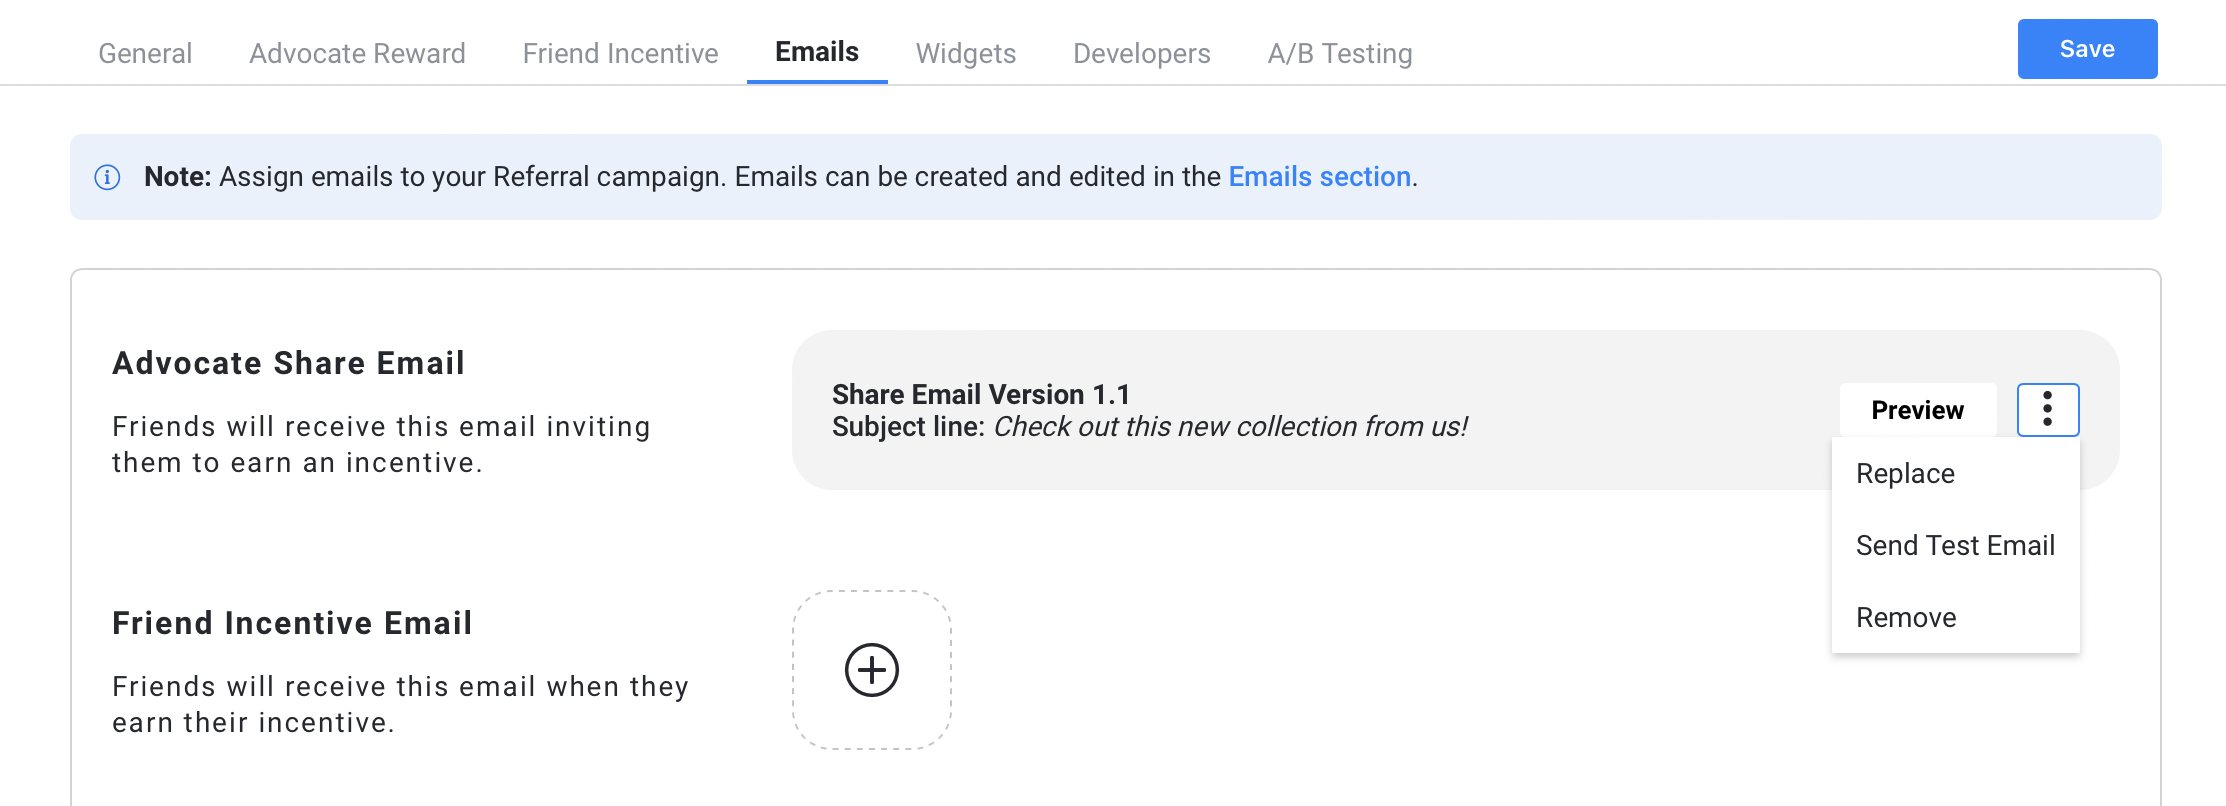
Assign an Email to a Campaign
To assign an email to a Referral Campaign, go to Referral > selected the desired Campaign > click the Emails tab within Campaign settings. Then click the (+) button next to the relevant email type and select the email you'd like to assign. Note: Archived emails will not be selectable.
You can also Replace or Remove an existing emails that is already assigned to the Campaign by clicking the three dot menu within the same tab.
Separately, assigning emails to Advocate Reward Tiers is done within the Advocate Reward > Tiers section of Campaign settings. Note: Only Advocate Reward Type emails can be assigned to a Tier.
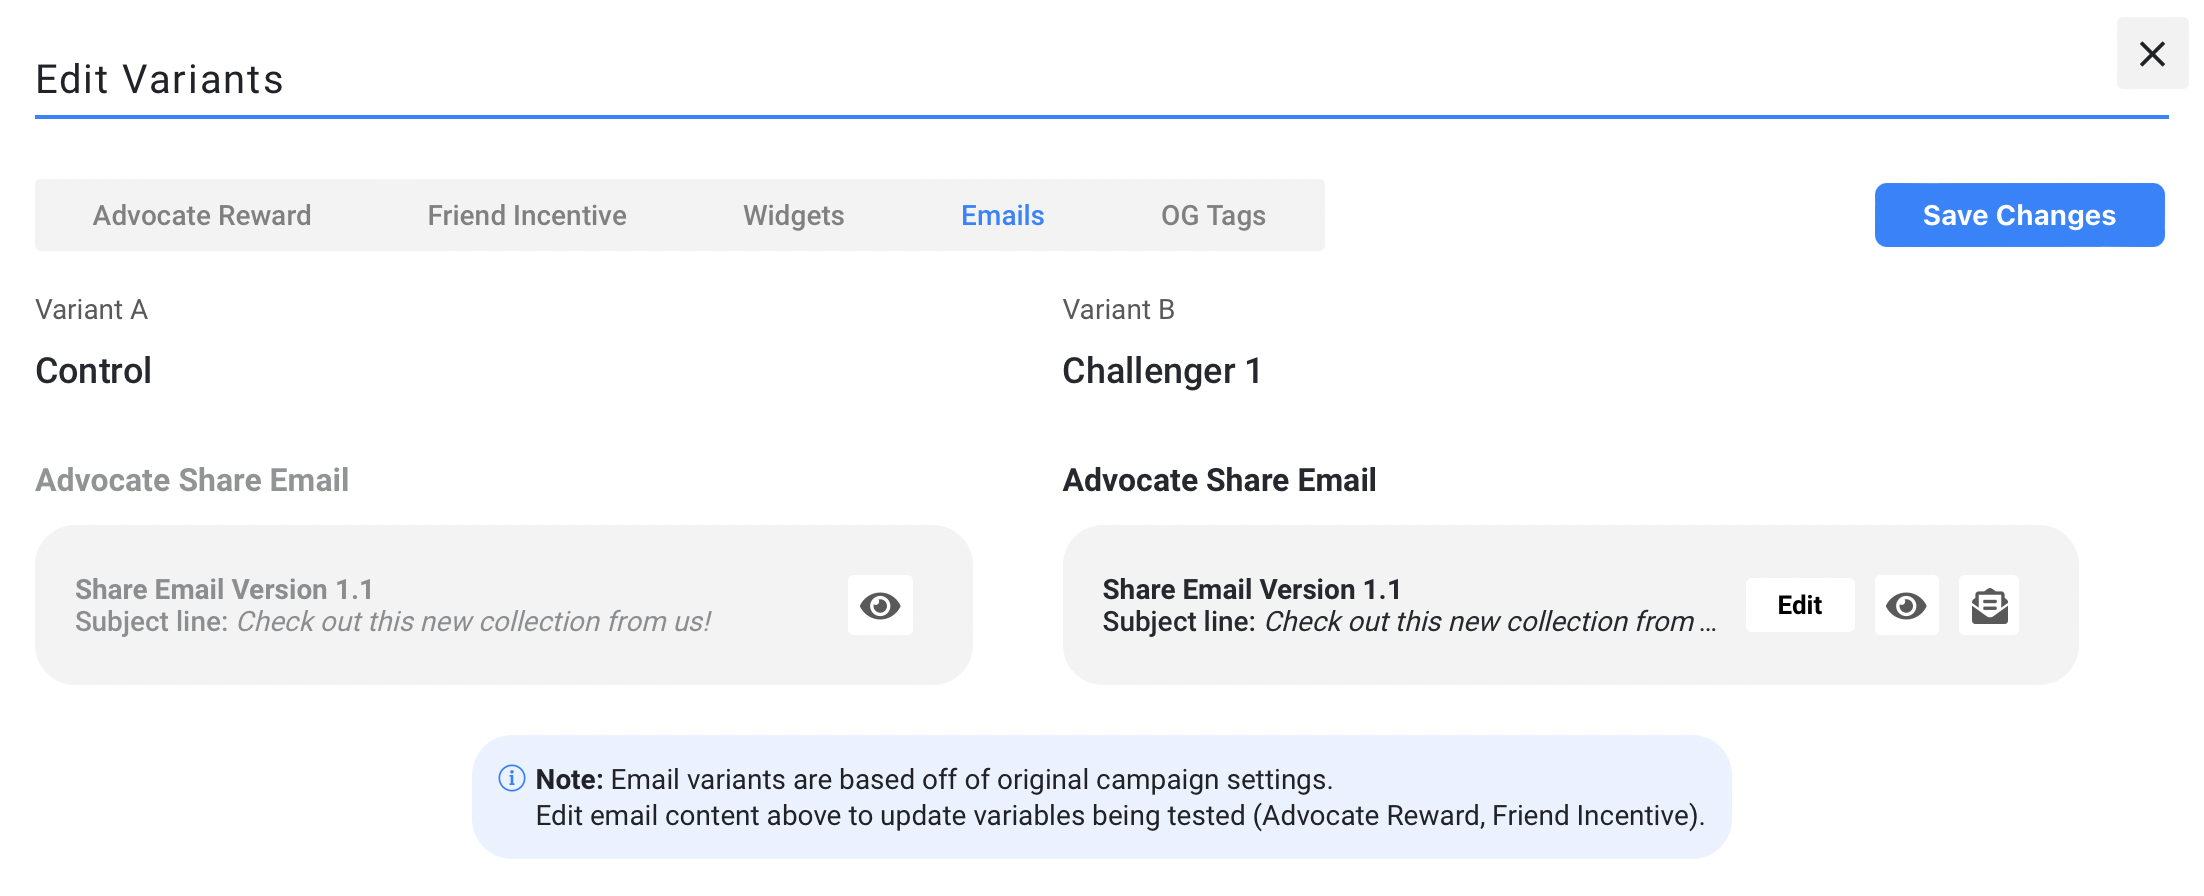
A/B Email Testing
Use the A/B Testing section within the referral campaign settings to run an A/B test by creating a variant. Each email variant will live inside the A/B test, not in the Emails section. Learn more about setting up A/B tests.
Additional Notes
- Learn more on how to properly set up an Expiration Reminder email, if using Account Credit or Points as a reward type.
- The Emails section is accessible by accounts with either Admin, Designer, or Developer role-based permissions.